
Mission particulars
Talent
Price
$50–$60 per linear foot
Estimated Time
6–8 hours
Putting in a stair runner can flip plain picket stairs into a chic point of interest, offering cushion in your ft and decreasing noise. With the precise supplies and instruments, most owners can full this activity in a day. Within the video above, we reveal the method of putting in a striped cotton runner on a picket staircase.
What Are Stair Runners?
Stair runners are slender carpeting strips that cowl a staircase’s heart, leaving some wooden uncovered on both aspect. They arrive in several supplies, patterns, and colours, permitting you to customise your stairs to match your property’s decor.
Advantages of Stair Runners
Stair runners have many benefits, corresponding to these:
- Added heat and luxury underfoot
- Improved security by offering stair traction
- Diminished footstep noise
- Picket tread safety
Forms of Stair Runners
When selecting a stair runner, think about these standard choices:
- Cotton: Delicate, breathable, and obtainable in several patterns
- Sisal or jute: Eco-friendly and provides texture
- Artificial fibers: Sturdy and straightforward to wash
- Wool: Pure, luxurious, and long-lasting
Getting ready for Stair Runner Set up
Earlier than you start putting in, collect the next supplies and instruments.
Supplies
- Carpet glue
- Carpet padding
- Double-sided carpet tape
- Stair runner carpet
- Staples (5/8-inch and 9/16-inch)
- Tackless strips
Instruments
- Carpet knife
- Carpet instrument
- Mixture sq.
- Knee kicker
- Pencil
- Pneumatic stapler
- Rubber mallet
- Staple gun
- Tape measure
- Tin snips
Measuring and Planning
Correct measurements are essential for a profitable set up. Right here’s what to do:
- Measure the peak of 1 riser and the depth of 1 tread.
- Add these measurements collectively and multiply by the variety of stairs.
- Add an additional 12 inches to ensure you have sufficient materials.
- Select a runner width that permits for even reveals on each side of the steps.
- They arrive in several lengths, so you might want to combine and match.
Putting in Carpet Runner on Stairs Overview

How To Set up Stair Rug Runner
Observe these step-by-step directions to put in your stair runner like a professional.
1. Lay Out Tackless Strips for a Stair Runner
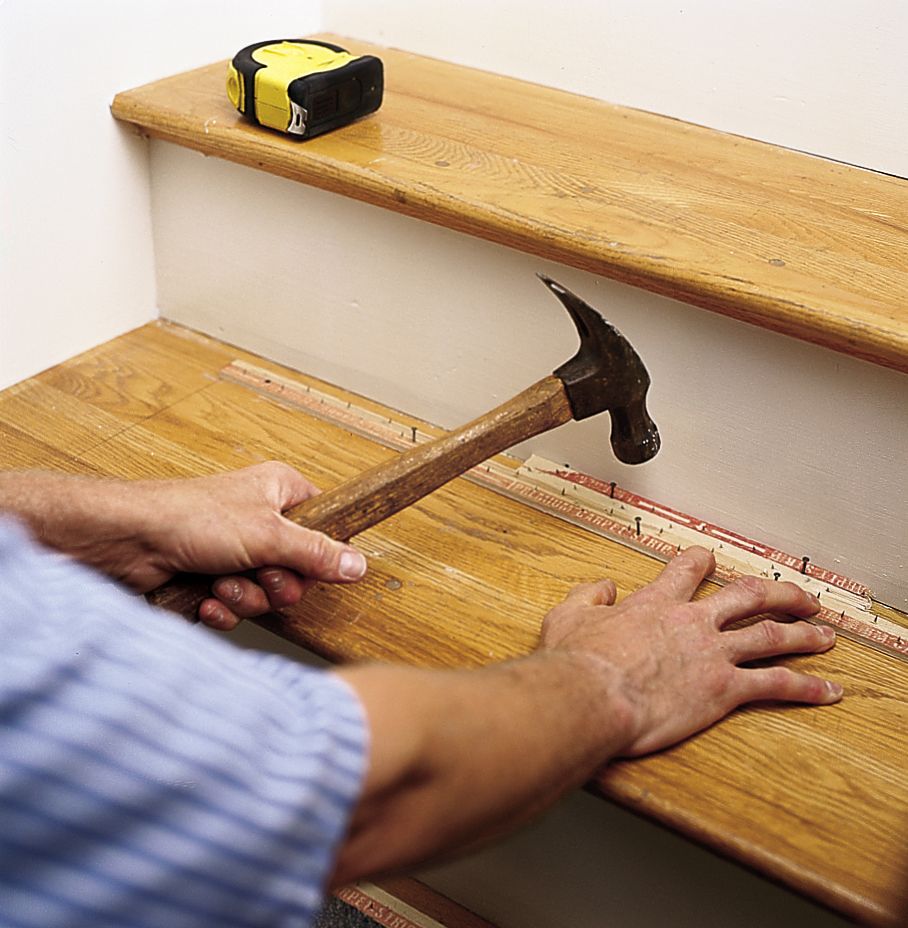
- Subtract the runner width from the staircase width (between the baluster and skirtboard) and divide by two.
- On each tread, evenly mark the space out from the skirtboard and from the balusters the place it meets the riser.
- For every tread, use sheet-metal snips to chop a tackless strip 2 inches shorter than the runner width. Make sure there’s a nail inside a pair inches of every finish.
- Place a scrap piece of strip flush in opposition to the riser. Middle the minimize strip—pins angled towards the riser—between the format marks. Butt it in opposition to the scrap and nail.
2. Match Carpet Pad
- Minimize carpet pad the identical width because the tackless strips and three inches longer than the depth of the tread.
- Butt pad to entrance fringe of tackless strip. Fasten fringe of pad to tread with 9⁄16-inch staples spaced each 3 inches.
- Pull pad tight round nosing and staple each 3 inches into underside of nosing.
- Minimize pad the place nosing and prime of riser meet.
Tip: When utilizing the waterfall technique, clip 3 inches off the corners of the pad the place it curves across the nosing. This helps conceal the pad.
3. Safe Runner to First Riser
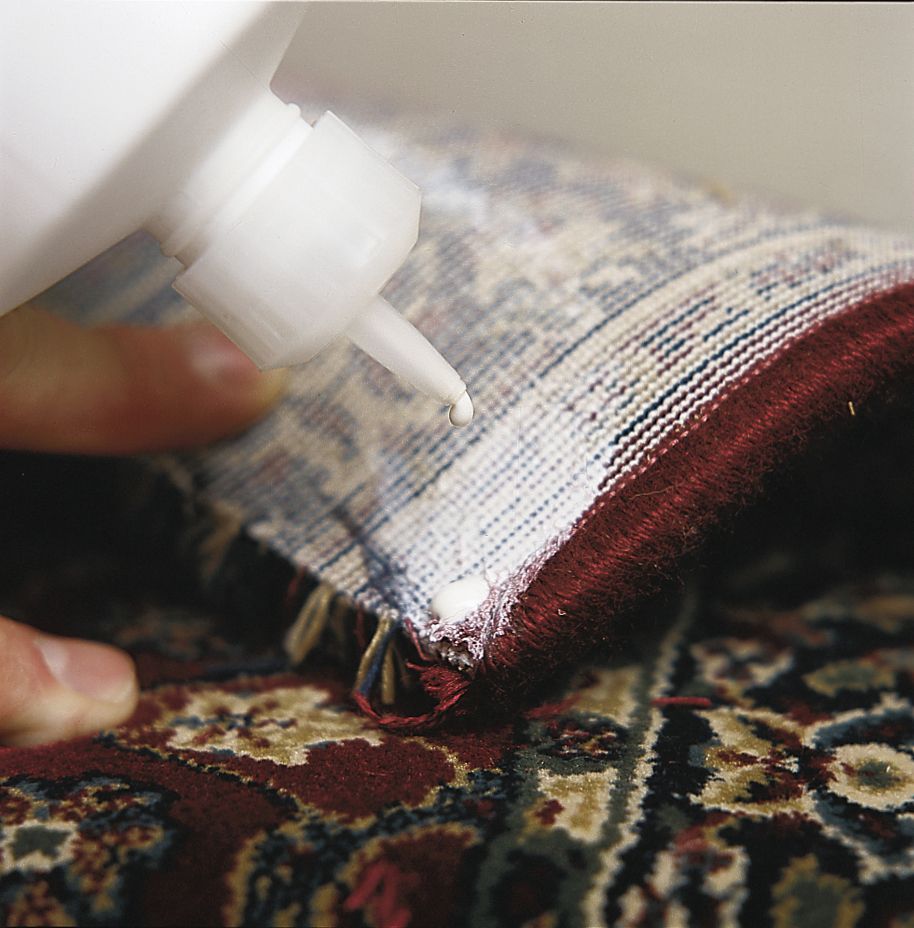
- Verify finish of runner with framing sq.. If not sq., mark, then minimize alongside backing with carpet knife. Dab minimize edges with latex carpet glue to stop fraying.
- After glue dries to the touch, unroll runner up 3 or 4 treads, ensuring it’s between the format marks.
- Push finish of runner in opposition to flooring at backside of first riser. Line up runner between the format marks.
- Staple finish of runner to backside of riser each 3 inches.
Tip: Push stapler by means of the pile and in opposition to the backing earlier than pulling set off.
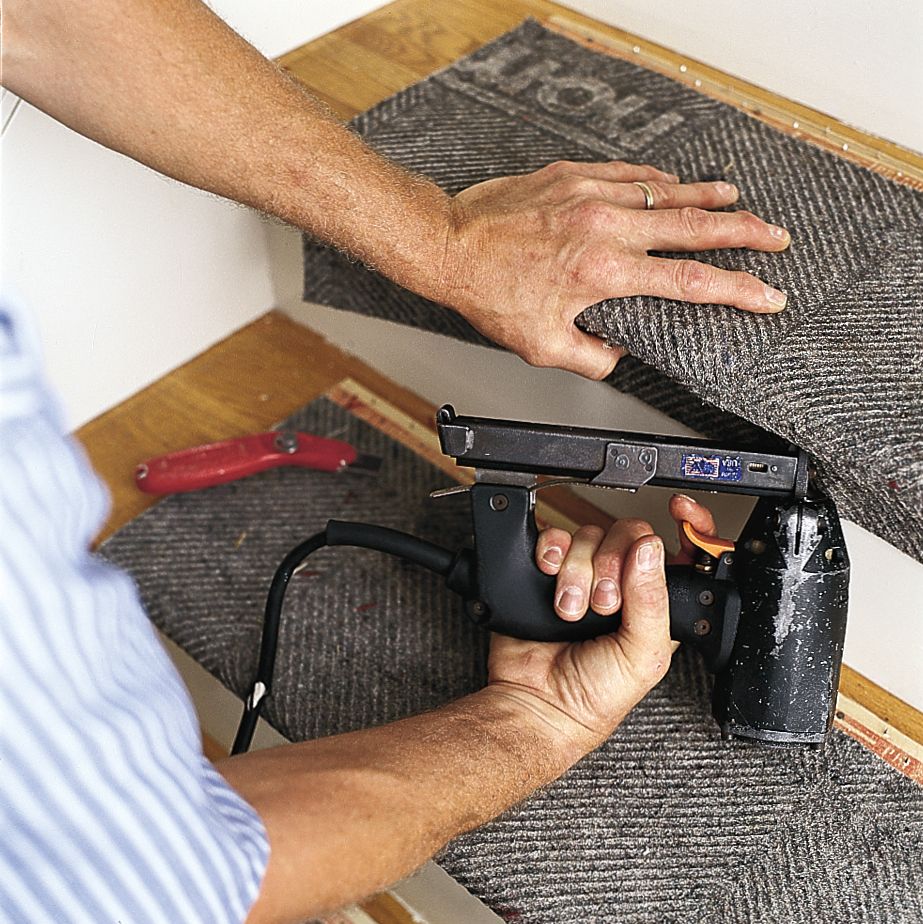
4. Connect Runner to Treads

- Line up runner between format marks on first tread. Push it hand-tight towards tackless strip.
- Place entrance fringe of knee kicker on heart of the runner about 2 inches from the riser. Maintain down entrance knob with one hand, utilizing the opposite hand to maintain the kicker’s shaft degree.
- Hit kicker with knee. Runner ought to interact tackless strip and grow to be taut. Repeat each 3 inches, aspect to aspect.
Tip: If runner bulges and doesn’t lie flat in opposition to the tread, carry it straight up off the strip and start once more.
5. Fasten Runner to Riser
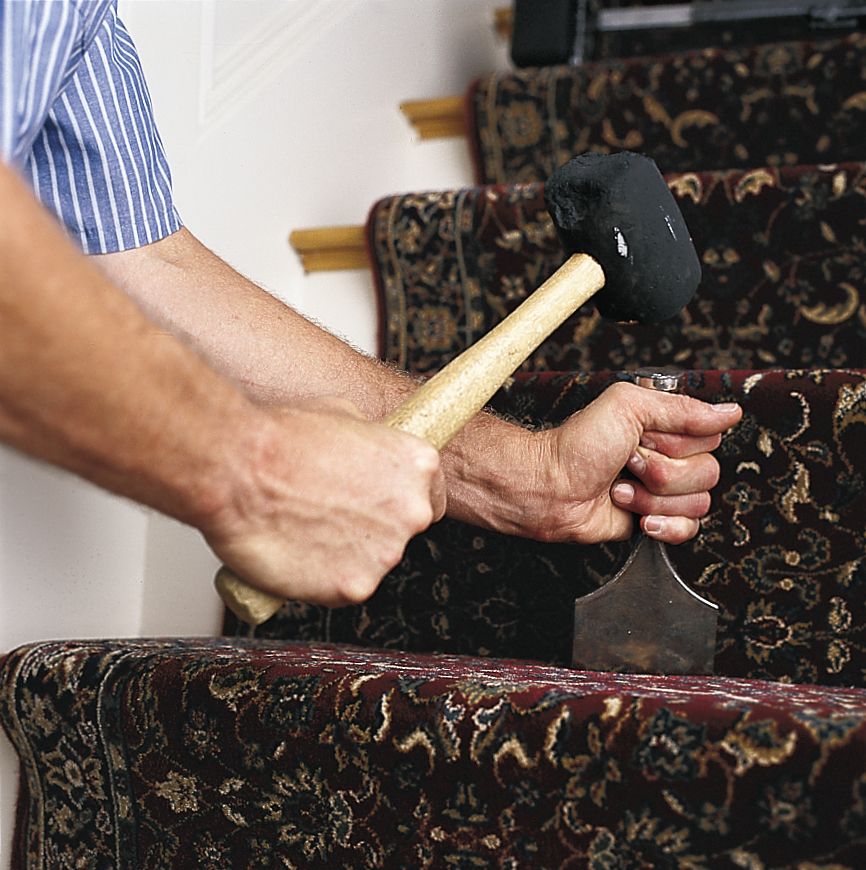
- Use carpet instrument and rubber mallet to pack runner tightly between the tackless strip and the riser.
- Close to each ends of the tackless strip, staple the runner into the crease the place riser meets tread.
- Staple every fringe of the runner 2 inches above backside of riser. (For upholstered set up, staple edges to riser, then staple runner to underside of nosing each 3 inches.)
- Repeat Steps 3 and 4 as much as final riser.
- At prime of final riser, minimize runner tight to the underside of the nosing or molding. Dab edges and finish with glue and staple into prime of riser and alongside edges each 3 inches.
Tip: Staple carpet on to stairs, by no means by means of the pad.
6. Set up Rods (elective)
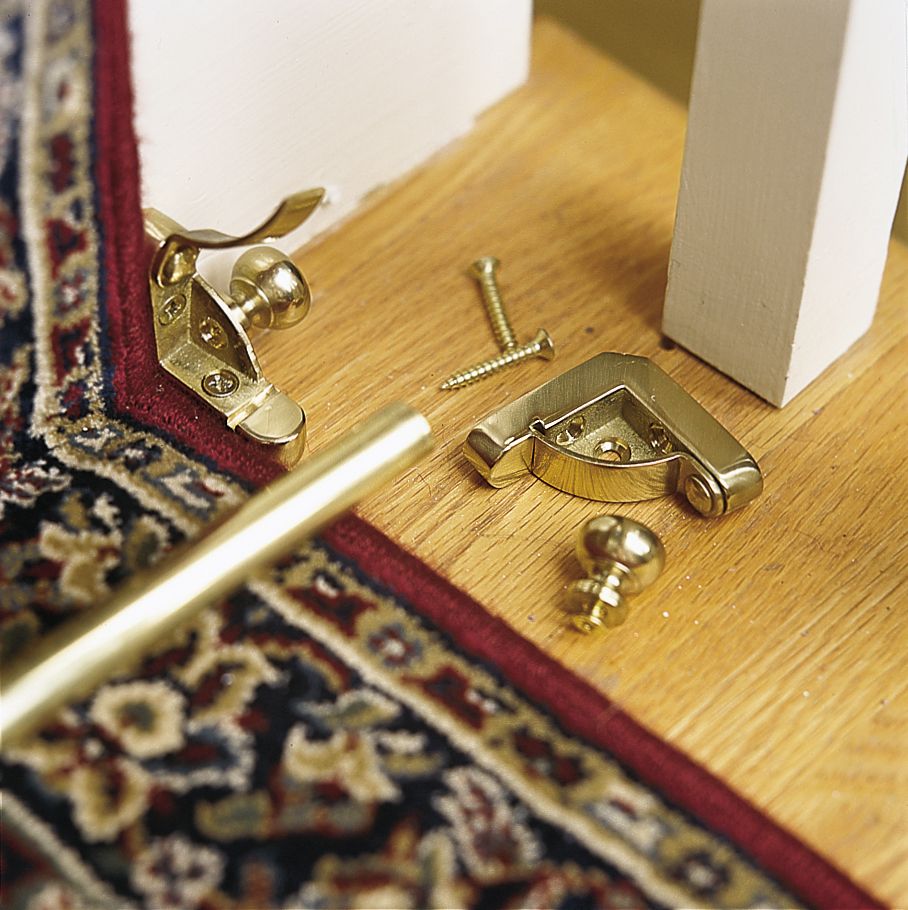
- Connect finials (if any) to outdoors of every rod bracket.
- Place a bracket in opposition to both fringe of the runner on the intersection of the tread and riser.
- Maintain them in place and mark the areas of the screw holes. Drill 1⁄16-inch pilot holes at every mark.
- Screw every bracket to tread and riser.
- Mark and minimize rods to size with a tubing cutter or hacksaw.
- Press rod into crease the place tread and riser meet. Safe each ends within the brackets.
Ending Touches
Full the set up with these ultimate steps:
- On the backside of the steps, create a hem by folding beneath the runner’s edge.
- Staple the hem to the underside riser or simply above any present molding.
- Trim any extra materials for a clear end.
Stair Runner Upkeep and Care
Good maintenance will lengthen the lifetime of your stair runner and hold it wanting its greatest.
Common Cleansing
Hold your stair runner in good condition with the following tips:
- Spot clear spills instantly to stop staining
- Use a carpet cleaner yearly for deep cleansing
- Vacuum repeatedly to take away grime and particles
Addressing Put on and Tear
Over time, your runner might present indicators of damage. We propose doing the next:
- Think about getting it professionally cleaned for cussed stains or an total refresh
- Restore any unfastened sections shortly to stop additional harm
- Rotate the runner now and again to distribute put on evenly
Addressing Widespread Stair Runner Challenges
Even with cautious planning, you would possibly encounter a couple of hiccups. Right here’s easy methods to sort out widespread points:
Misalignment and Wrinkles
Misalignment and wrinkles can have an effect on your stair runner’s look. Repair it with these steps:
- If wrinkles kind, gently carry and restretch the runner earlier than securing it.
- Pull the runner taut as you staple, retaining it centered.
Tough Angles
Stairs with tough angles or uncommon shapes require particular consideration. Listed here are some ideas:
- Measure and minimize the runner to suit difficult spots, making a seamless look.
- Use further padding to fill gaps and create a easy floor.
Seams
Making a seamless look when becoming a member of sections is essential to your stair runner wanting skilled. Take these steps:
- Align patterns rigorously to maintain every thing constant.
- Use carpet glue or seam tape to safe the joins.
Extra Suggestions for a Skilled End
A number of further ideas may help you obtain a sophisticated look. Strive the next:
- Guarantee staples are evenly spaced for a uniform end.
- Trim any frayed edges for a clear look.
- Use a knee kicker to maintain the runner tight.