
Problem particulars
Expertise
Worth
Depends upon the dimensions of the restore
Estimated Time
Eventually to refill joints
Q: The mortar joints surrounding the stones in my walkway are crumbling. Can they be patched? — Nellie Kurtzman, Mount Vernon, NY
Martin D’Arcy, proprietor of DNF Constructing, replies: A stone walkway with cracked mortar is an eyesore and may change right into a tripping hazard if water will get beneath and loosens the stones.
Repairing Mortar in a Stone Walkway
“One of many easiest methods to revive walkway mortar joints is with a sand-topping mortar mix, which is stronger than widespread mortar and may take care of wider joints,” says D’Arcy. “I mix it with an acrylic fortifier so that the joints might be a lot much less weak to water penetration.”
“The hardest part of this job is chipping out the crumbly earlier mortar with out damaging the stones. As quickly because the earlier stuff is out, filling the joints is so simple as adorning a cake. Merely take note of that whereas the model new mortar gained’t match the prevailing mortar shade, it might lighten and blend in over time. The one choice to get the equivalent shade might be to interchange all the earlier mortar, crumbling or not. Cope with this job solely when there’s no hazard of frost. A dip beneath freezing can destroy up to date mortar.”
Provides and Devices Needed To Restore Stone Walkway Mortar
Sooner than you get started, acquire the following devices and provides:
- Dry mortar mix
- Acrylic fortifier
- Safety glasses
- Gloves
- Kneepads
- 3-pound sledgehammer
- Masonry chisel
- Masonry brush
- Paintbrush
- Sponge
- Brick trowel
- Grout bag
- Pointing trowel
- Mortar tub
Stone Walkway Joint Restore Course of
Repairing the mortar joint takes a couple of day’s worth of chiseling, mixing, piping, and troweling.
1. Chisel Out the Mortar

First, you’ll take away the earlier and crumbling mortar. You’ll want to do this rigorously to stay away from damaging the encircling stones. Put in your gloves, safety glasses, and kneepads to protect your self in opposition to any flying particles by way of the chiseling course of. This step could be bodily intensive, so take breaks as you need to hold appropriate.
Use a cold chisel and 3-pound sledgehammer to carefully get away the crumbling mortar. Chisel correct proper right down to the setting mattress, nevertheless use warning as you go deeper. For considerably stubborn areas, use a grinder with a diamond blade.
As quickly because the earlier mortar is eradicated, use a stiff-bristled nylon brush to scrub out the joints and take away unfastened particles and dirt. This will help the model new mortar bond increased.
2. Make the Topping Mix
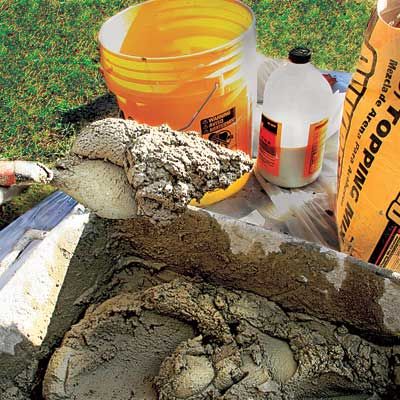
A sand-topping mortar is biggest for repairs as a result of it’s sturdy and may take care of wider joints. Proper right here’s straightforward strategies to place collectively it:
Pour the dry mortar mix proper right into a wheelbarrow or big mixing container. Stir in an acrylic fortifier consistent with the producer’s instructions. This helps improve the mortar’s water resistance and sturdiness. Then, steadily add water to the mix, stirring constantly until the mix resembles peanut butter—sticky nevertheless workable.
The mix will keep workable for about 45 minutes, so don’t mix additional mortar than you need for that time.
3. Fill the Joints
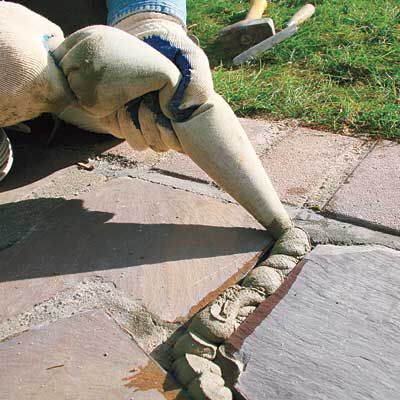
Alongside together with your mortar mix prepared, it’s time to fill the joints between the stones. Sooner than you do, sponge the stones and joints with water. By “priming” them with moisture first, they’ll be a lot much less susceptible to take up the moisture from the up to date mortar.
Ladle the mortar proper right into a grout bag or zip-top plastic bag with a 1/2-inch diameter hole decrease out from one nook. Starting at one end, squeeze the mortar in a clear, regular motion that forces it to the underside of the joints.
Replenish the joint to a depth of about 1 inch in a single go, leaving the mortar merely above the stones. Deeper joints must be stuffed halfway, packed down alongside together with your trowel, then topped off. If any mortar lands on excessive of the stones, scrape it off immediately to cease staining.
4. Trowel the Mortar
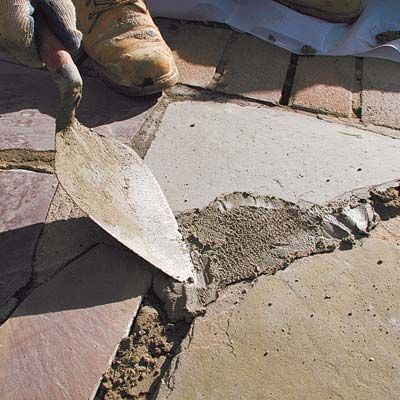
After filling the joints, type and compact the mortar for a transparent finish and professional-grade sturdiness.
Use your brick trowel to push the mortar down into the joints, so it’s well-compacted and free of air pockets. Then, roughly instrument it to the equivalent high because the prevailing joints that embody it. Scrape off the excess mix and dump it once more into your wheelbarrow.
As you are employed, dip the trowel in water to keep up it clear and stop up to date mortar from sticking. You should additionally use a damp sponge to scrub any mortar smears from the stone surfaces.
5. Pack it Down
After the preliminary troweling, allow the mortar to set barely sooner than the last word pack-down. This will give your accomplished joints a cultured look and help forestall future cracks.
Begin this course of 60 to 90 minutes after your first filling and troweling. You’ll know that the mortar is ready by pressing down on it with a thumbprint. If the print stays, you’re good to go.
Use a tuck-pointing trowel to scrub and pack down the mortar. Be sure that it matches every the height and profile of your present joints. Work methodically all through the joint and maintain stress fixed to get a good finish.
Protect sponge-cleaning the stone surfaces as important to remove mortar residue and forestall staining.
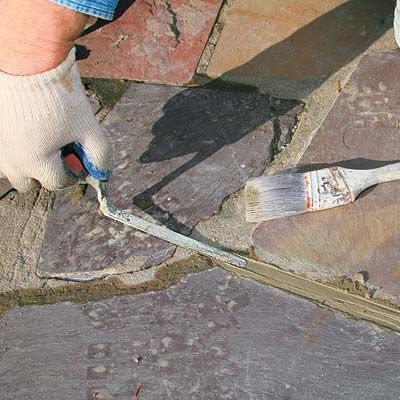
6. Brush the Joints
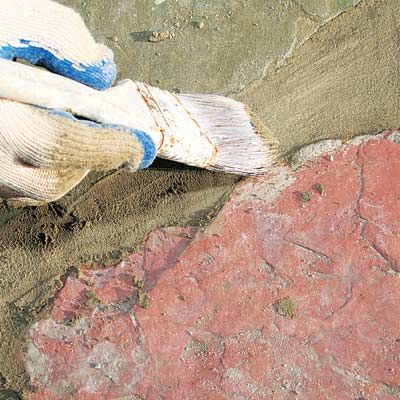
The final word step throughout the course of is to brush the joints. Clear them over with a stiff, dry, natural-bristle brush. Go in a single path so the texture stays uniform, and take away any small bumps or ridges that the tuck-pointing trowel left behind. The mortar is partially set, so that you just don’t must disturb it an extreme quantity of—be delicate nevertheless thorough.
After brushing, you may start to position away your gives. Let the joint proceed to remedy in a single day, and maintain foot web site guests off the walkway for at least the following day so each factor can set accurately.
Mortar Curing and Aftercare
Your repaired mortar joint will completely harden in a couple of week. Even in case you suppose that it’s completely cured, it is best to nonetheless be delicate with it.
Extreme temperatures may make the curing course of a bit additional troublesome. If the local weather’s scorching, windy, or dry, maintain it moist with damp burlap. Likewise, don’t expose the mortar to freezing temperatures, as this can hurt it sooner than it’s completely cured.