
Uncover methods to assemble a shoe rack bench with help from This Outdated House regular contractor Tom Silva and host Kevin O’Connor.
We is also compensated when you purchase via hyperlinks on our web page. Our Critiques Employees is devoted to delivering honest, aim, and neutral critiques on residence companies.
A shoe rack bench typically is a game-changer in your entryway, providing storage and seating in a single trendy piece. An expert DIYer can perhaps assemble one in spherical 5 hours, along with prep, assembling, and ending touches. Inside the video above, This Outdated House regular contractor Tom Silva explains learn to assemble a sturdy, Craftsman-inspired shoe rack bench using clear, vertical-grain Douglas fir boards.
Provides and Devices for Developing a Shoe Rack Bench
Consistency is crucial when decreasing and shaping the quite a few gadgets that go into this rack. Silva achieved that using a miter observed and a desk observed. For lumber, he used fir porch decking, which can be found at residence services.
To assemble the shoe rack, Silva used a mixture of wood glue and pocket hole screws using a K4 jig manufactured by Kreg. For the top, he utilized a mixture of Clear Satin and Extreme Gloss Water-Based totally Inside Polyurethane Spray Paint, manufactured by Varathane.
Altogether, this shoe rack makes use of roughly $150 in provides. Proper right here’s what you’ll need.
Provides
- 1-by-4-inch clear, vertical-grain Douglas fir boards (32 linear ft)
- 2-by-2-inch clear, vertical-grain Douglas fir (6 linear ft)
- Picket glue
- Pocket screws
- Sanding disks (80-, 100-, 120-, 150-, 220-, and 320-grit)
- Tack materials
- Spray-on extreme gloss urethane
- Spray-on satin urethane
Devices
- Tape measure
- Miter observed
- Desk observed
- Sanding block
- 24-inch bar clamp
- Mallet
- Pocket hole jig
- Drill driver
- Two No. 2 square-drive bits (1 and 6 inches prolonged)
- Random-orbit sander
Shoe Rack Bench Problem Preparation

Tom used a desk observed to mill 1-by-4 Douglas fir boards into the dadoed rails, rabbeted slats, and 1/4-inch strips wished to assemble this enterprise.
Overview and Decrease Guidelines for DIY Shoe Rack Bench
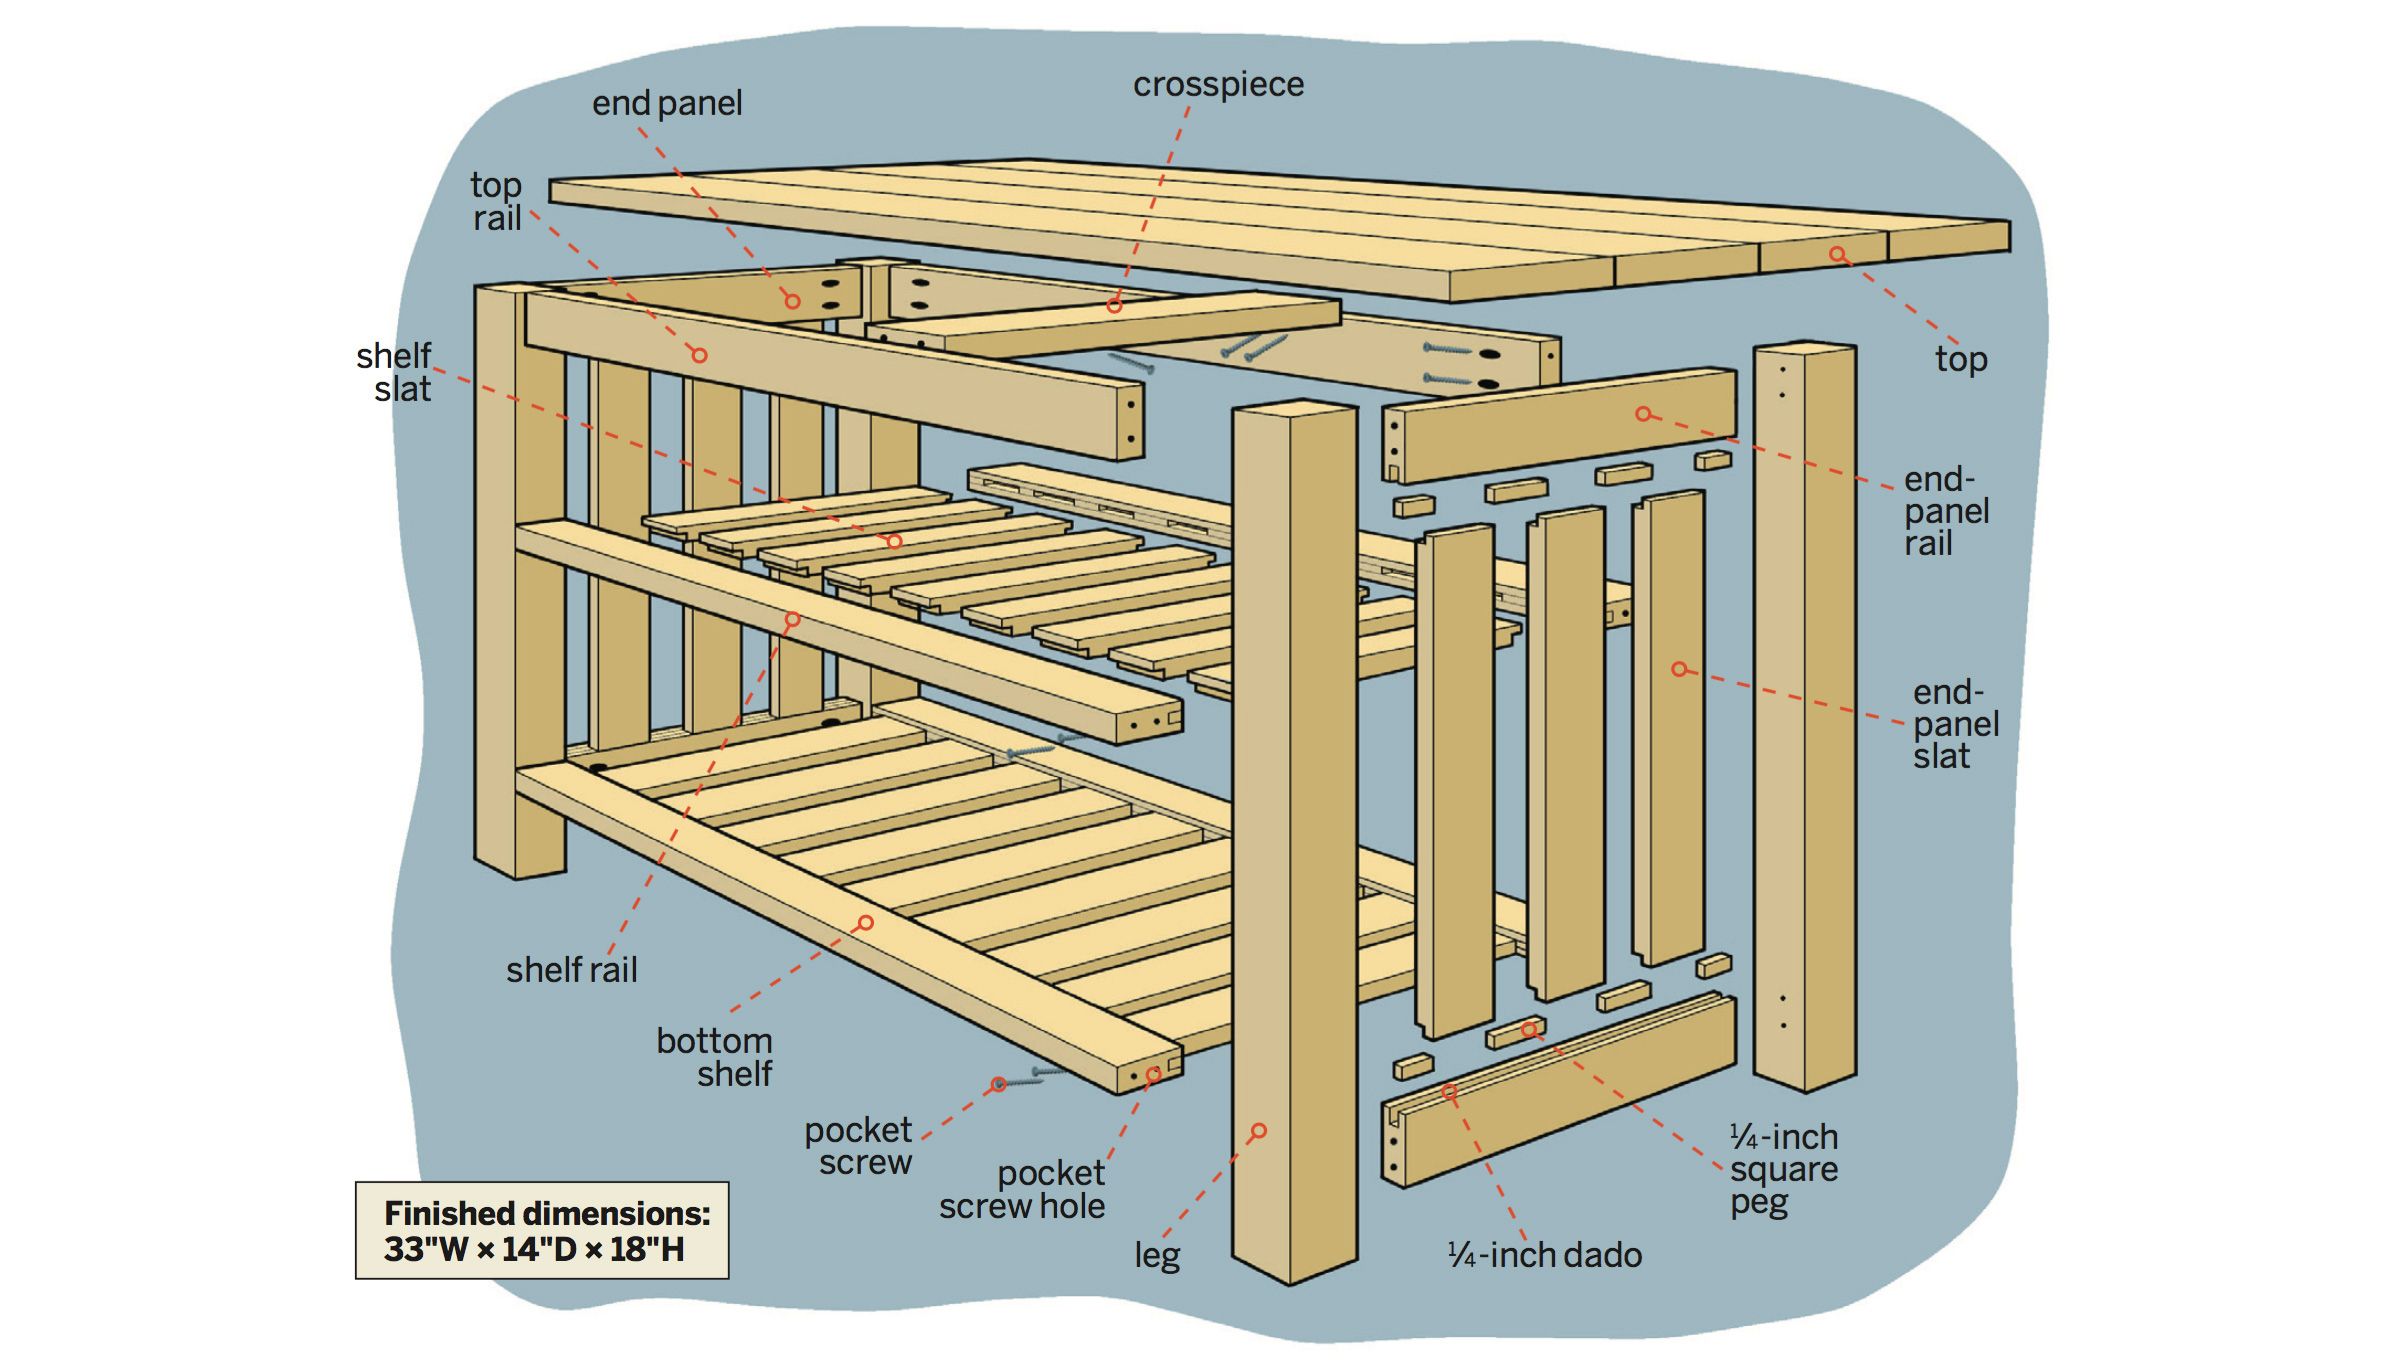
- Legs: 2-by-2s, 4 at 17 1/4 i nches
- End-panel slats: six at 1/2-by-1 3/4-by-12 1/4 i nches
- End-panel rails: 4 at 3/4-by-1 3/4-by-10 1/2 inches
- Shelf slats: 18 at 1/2-by-1 3/4-by-10 1/2 inches
- Excessive rails and shelf rails: six at 3/4-by-1 3/4-by-28 inches
- Excessive: 1x4s, 4 at 18 inches
- Pegs: 76 at 1/4-by-1/4-by-1 inch
Acquire the cut back guidelines.
Steps To Assemble a DIY Shoe Rack
Adjust to along with Silva as he assembles the piece.
1. Decrease Gadgets to Dimension and Width
Using a miter observed, trim the stock to the lengths inside the cut back guidelines. On a desk observed, rip the slats to a 1/2 inch thick, as confirmed. Proper right here, a jig retains Silva’s fingers protected. Use that observed to moreover cut back 1/4-inch-thick rabbets inside the slat ends, 1/4-inch-wide dadoes inside the rail edges, and rip the rails in half. Flippantly sand the entire cut back edges.
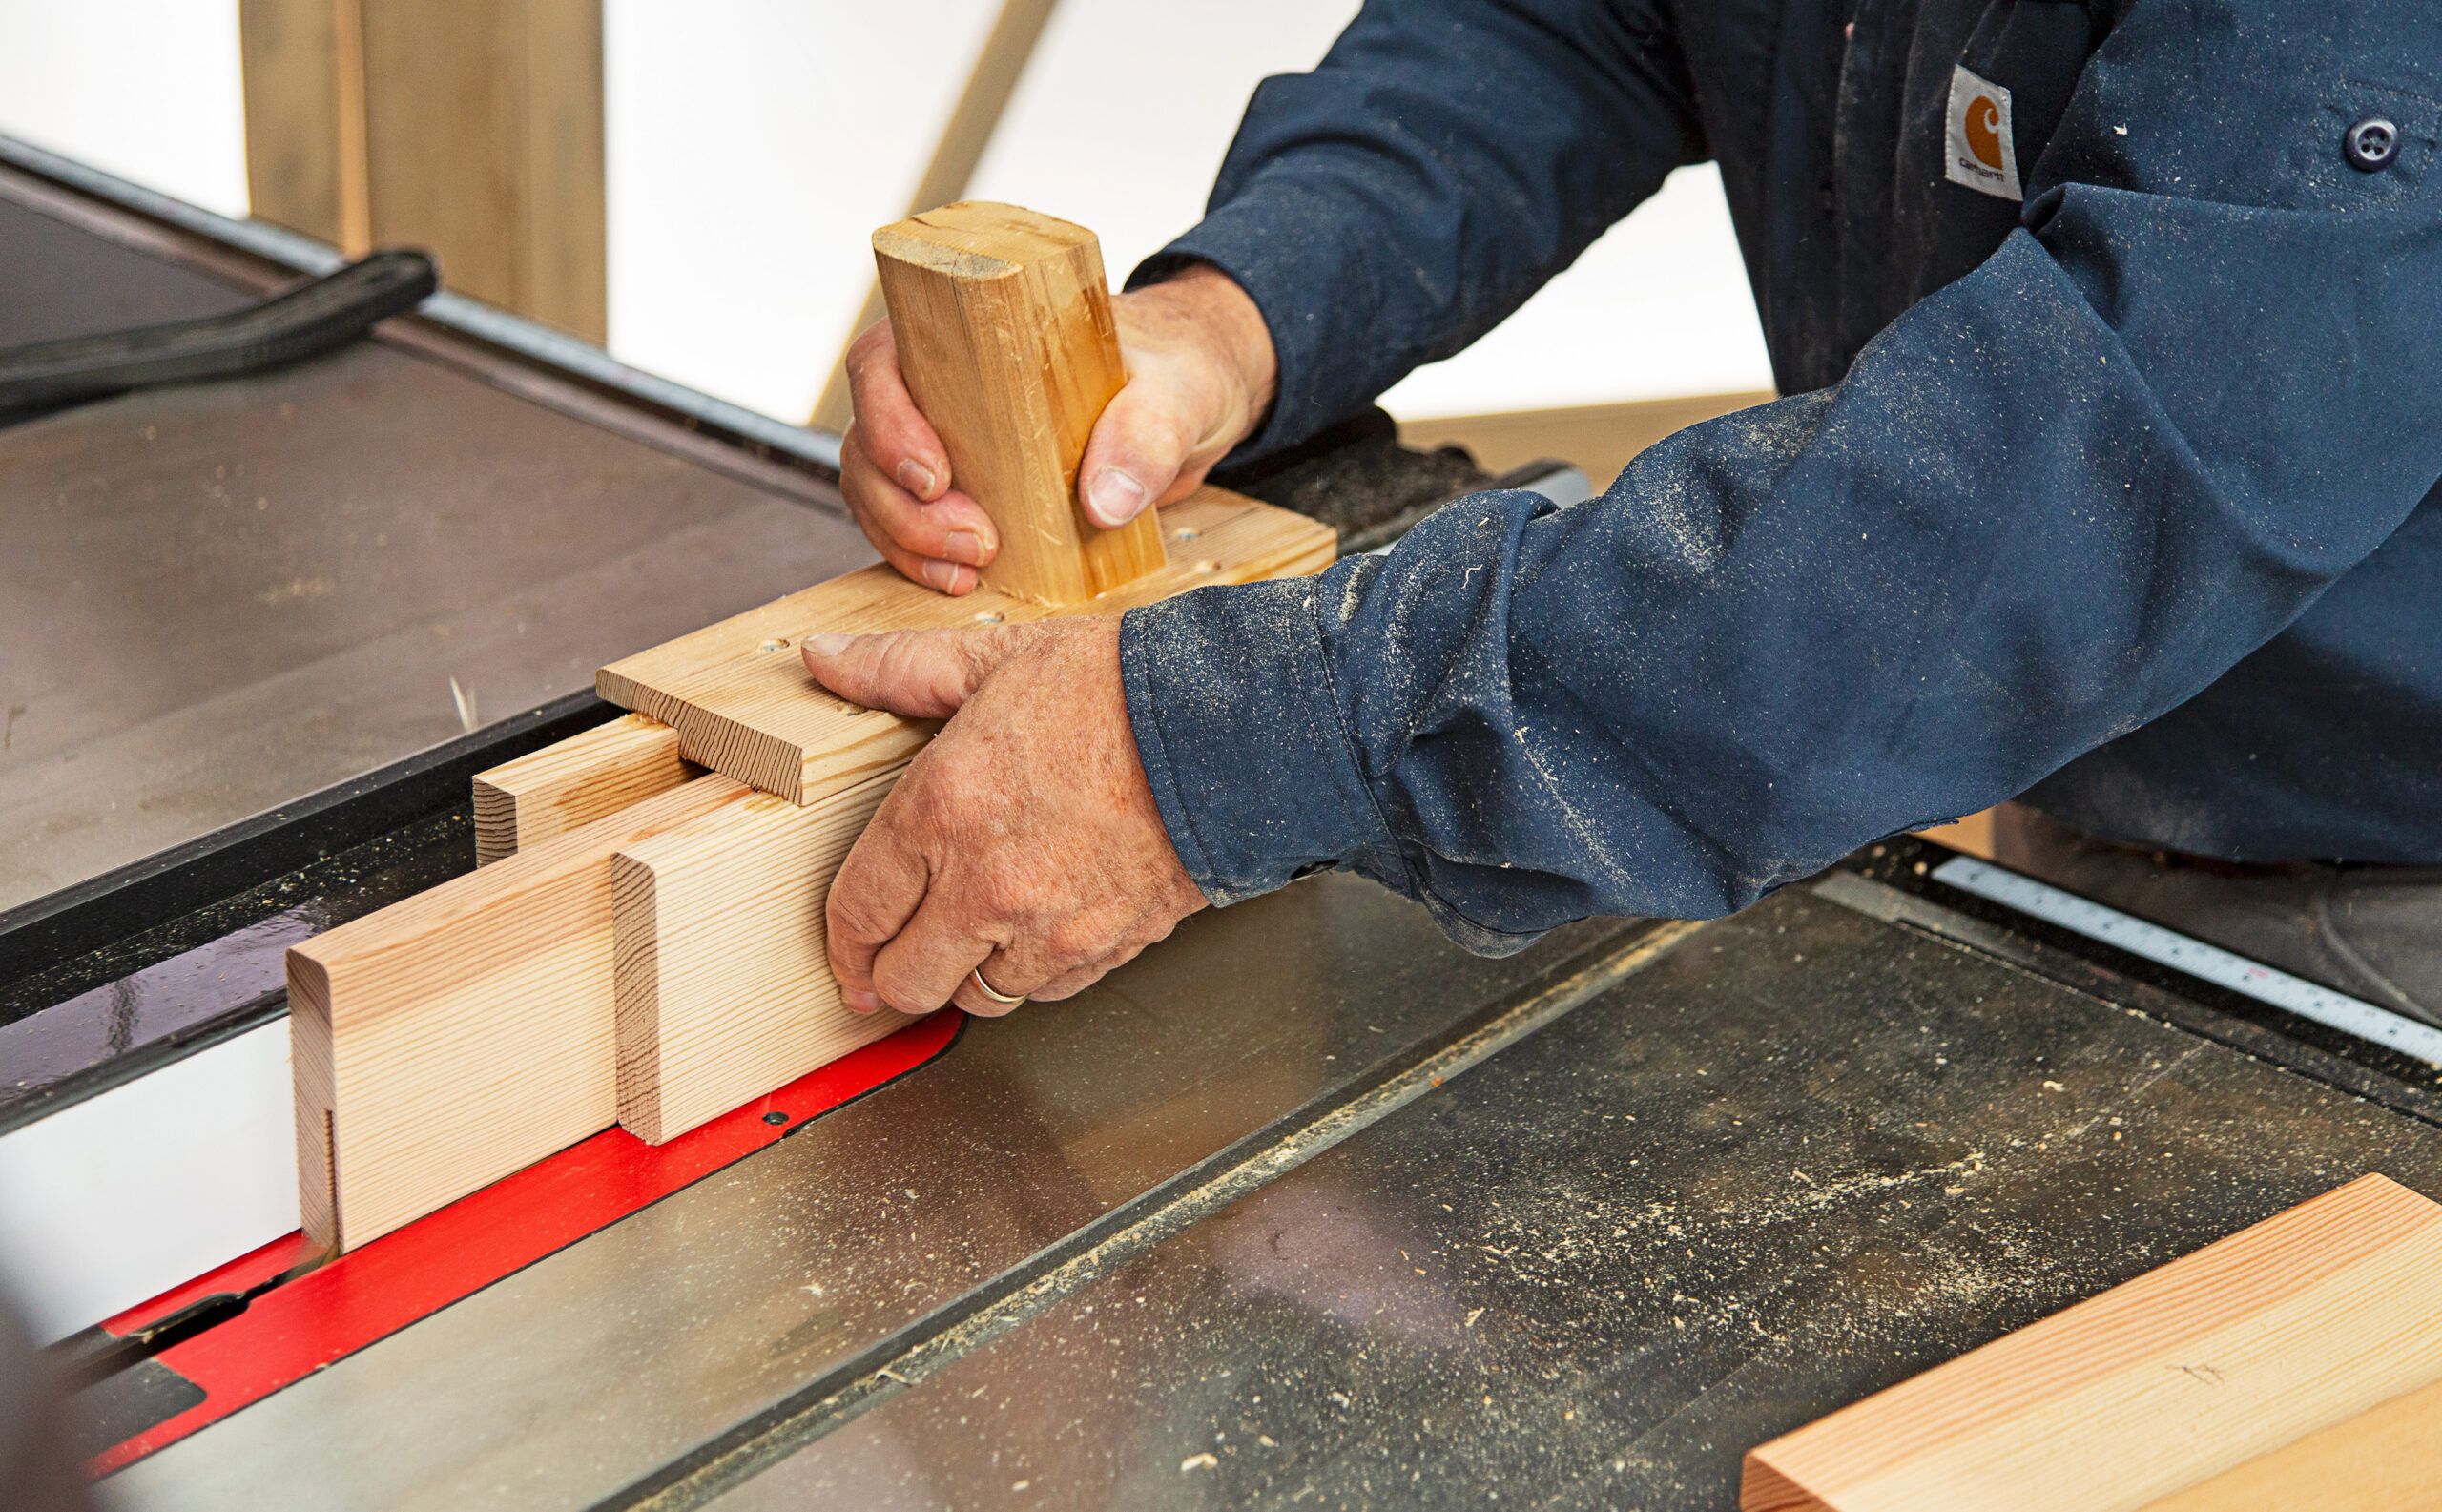
2. Glue the Pegs to the Dadoes
The slat ends match into mortise-like slots inside the rails of the tip panels and cupboards. To make these slots, glue 1/4 -inch-square pegs (confirmed at correct inside the {photograph} above) into the dado using the slats to set the spacing. Gently take away the slats, and when the glue items, sand the pegs flush with the tops of their dadoes.
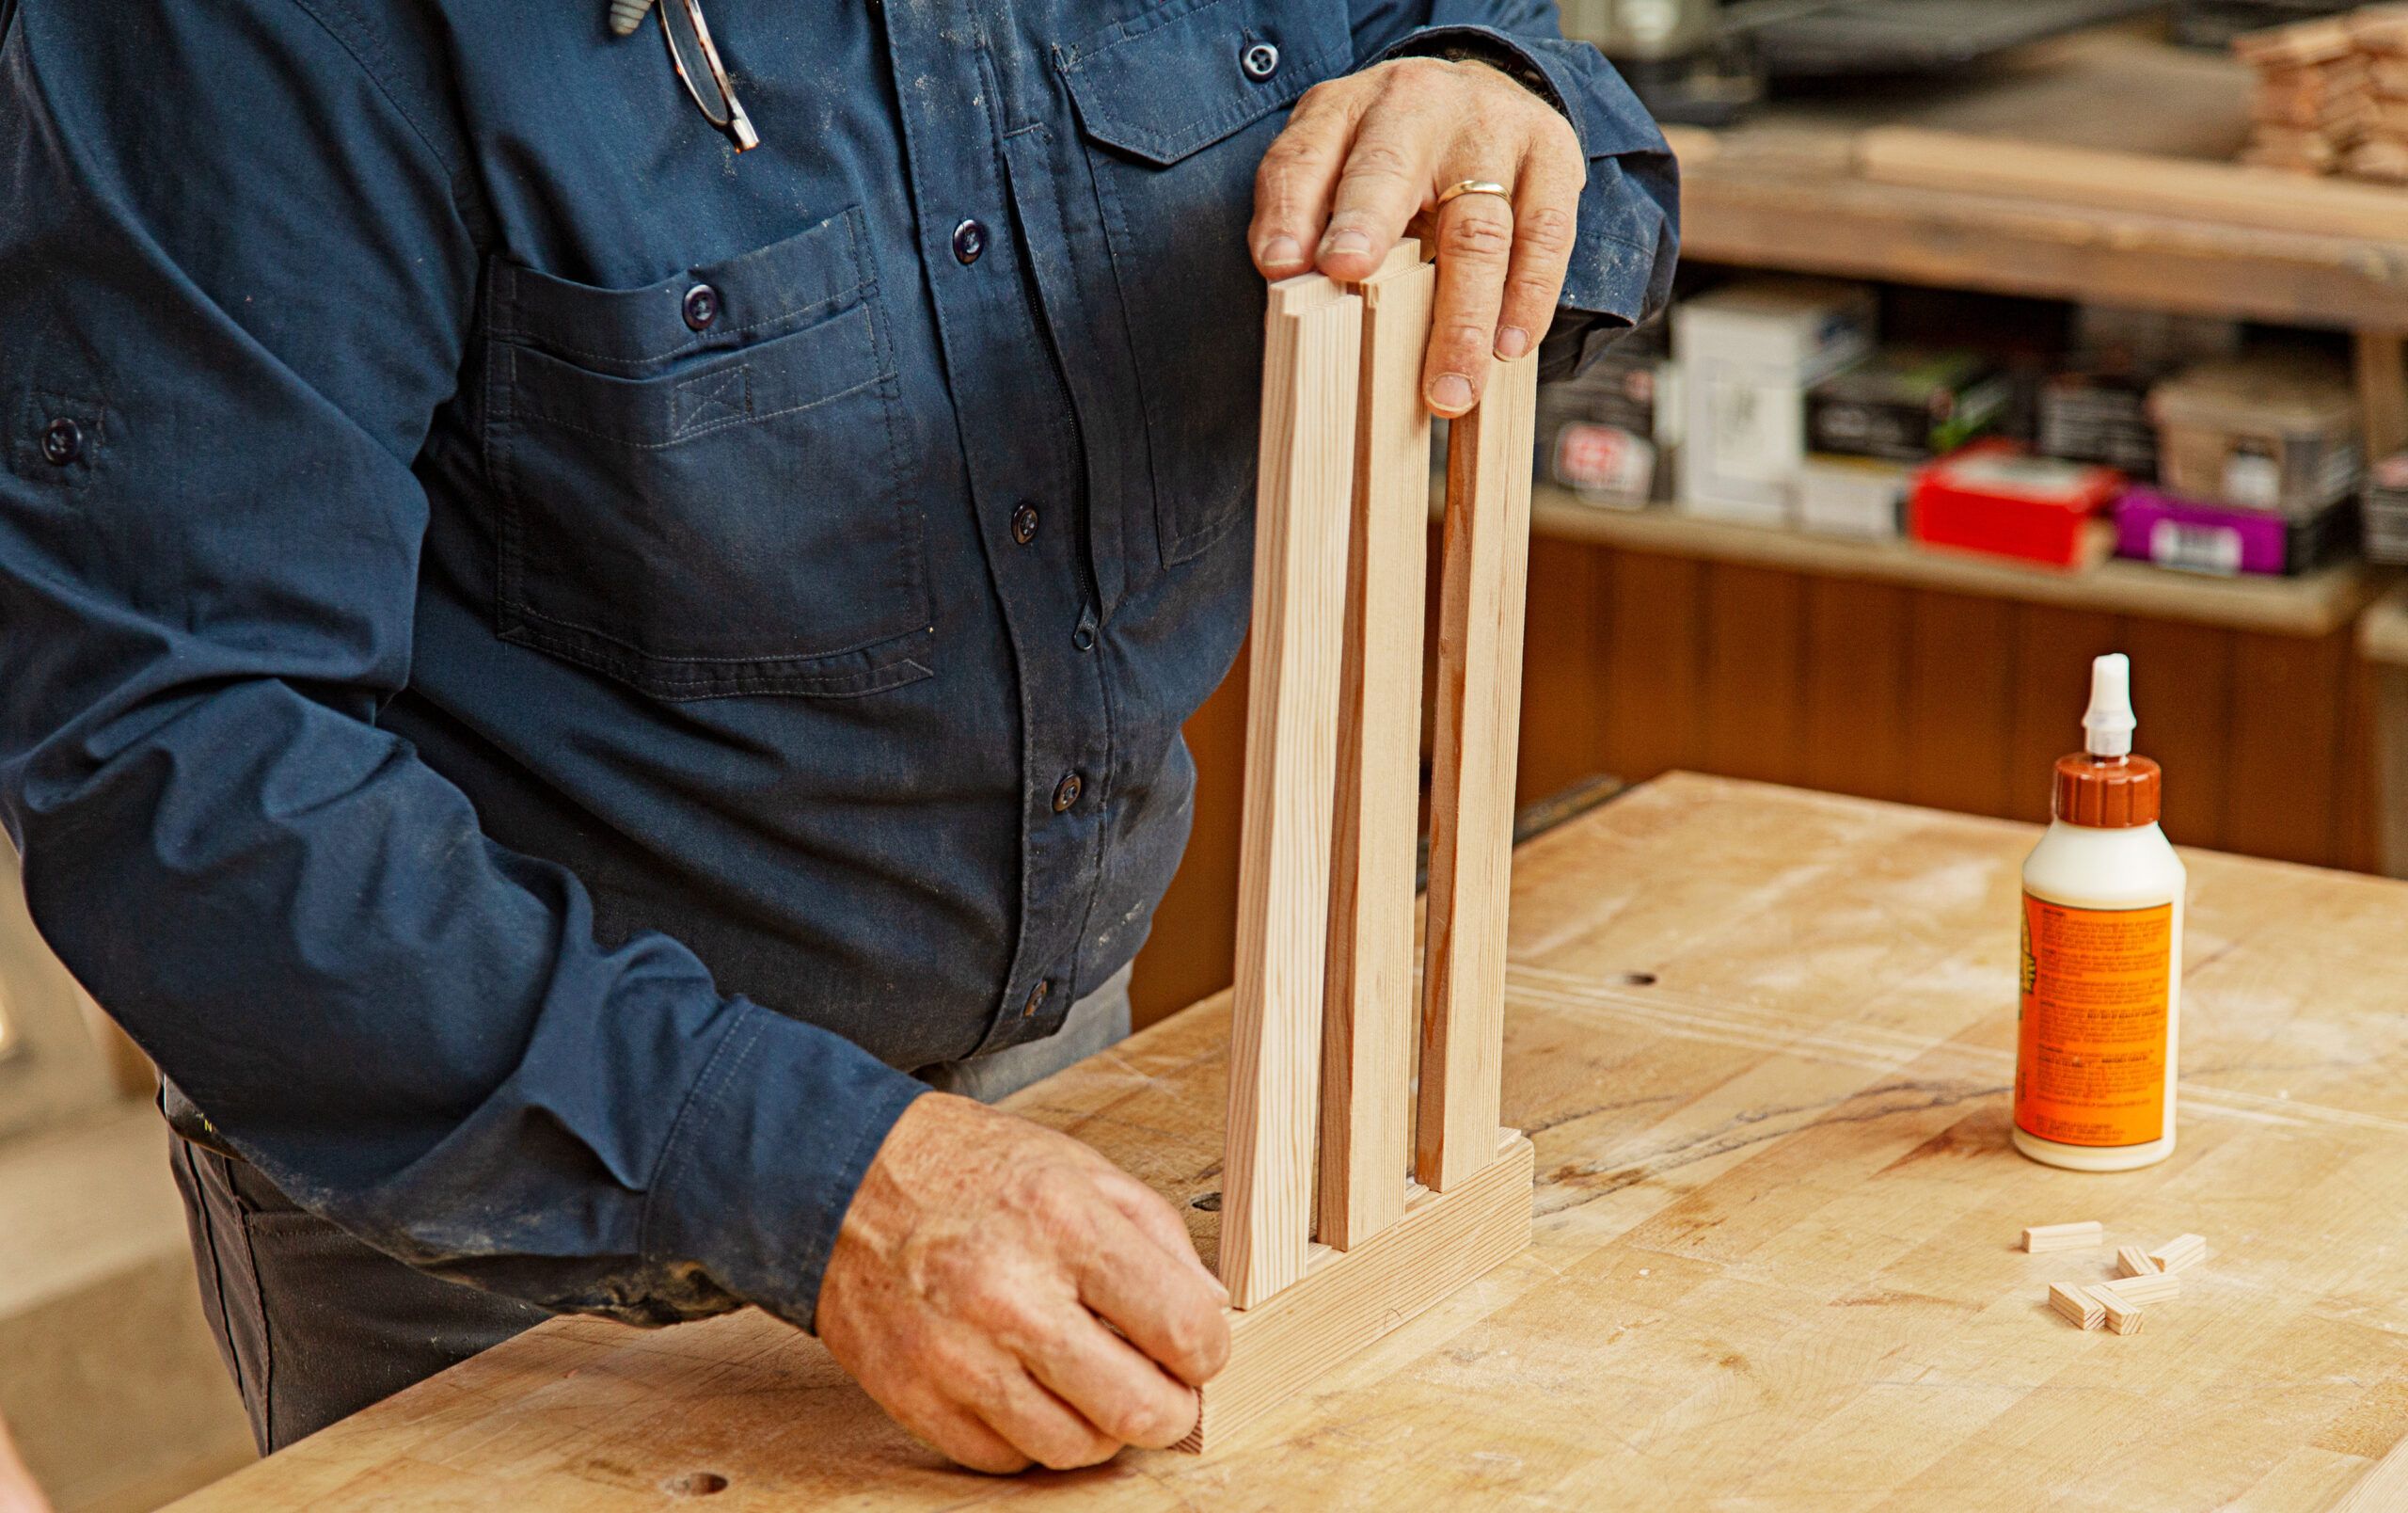
3. Glue the Slats and Rails
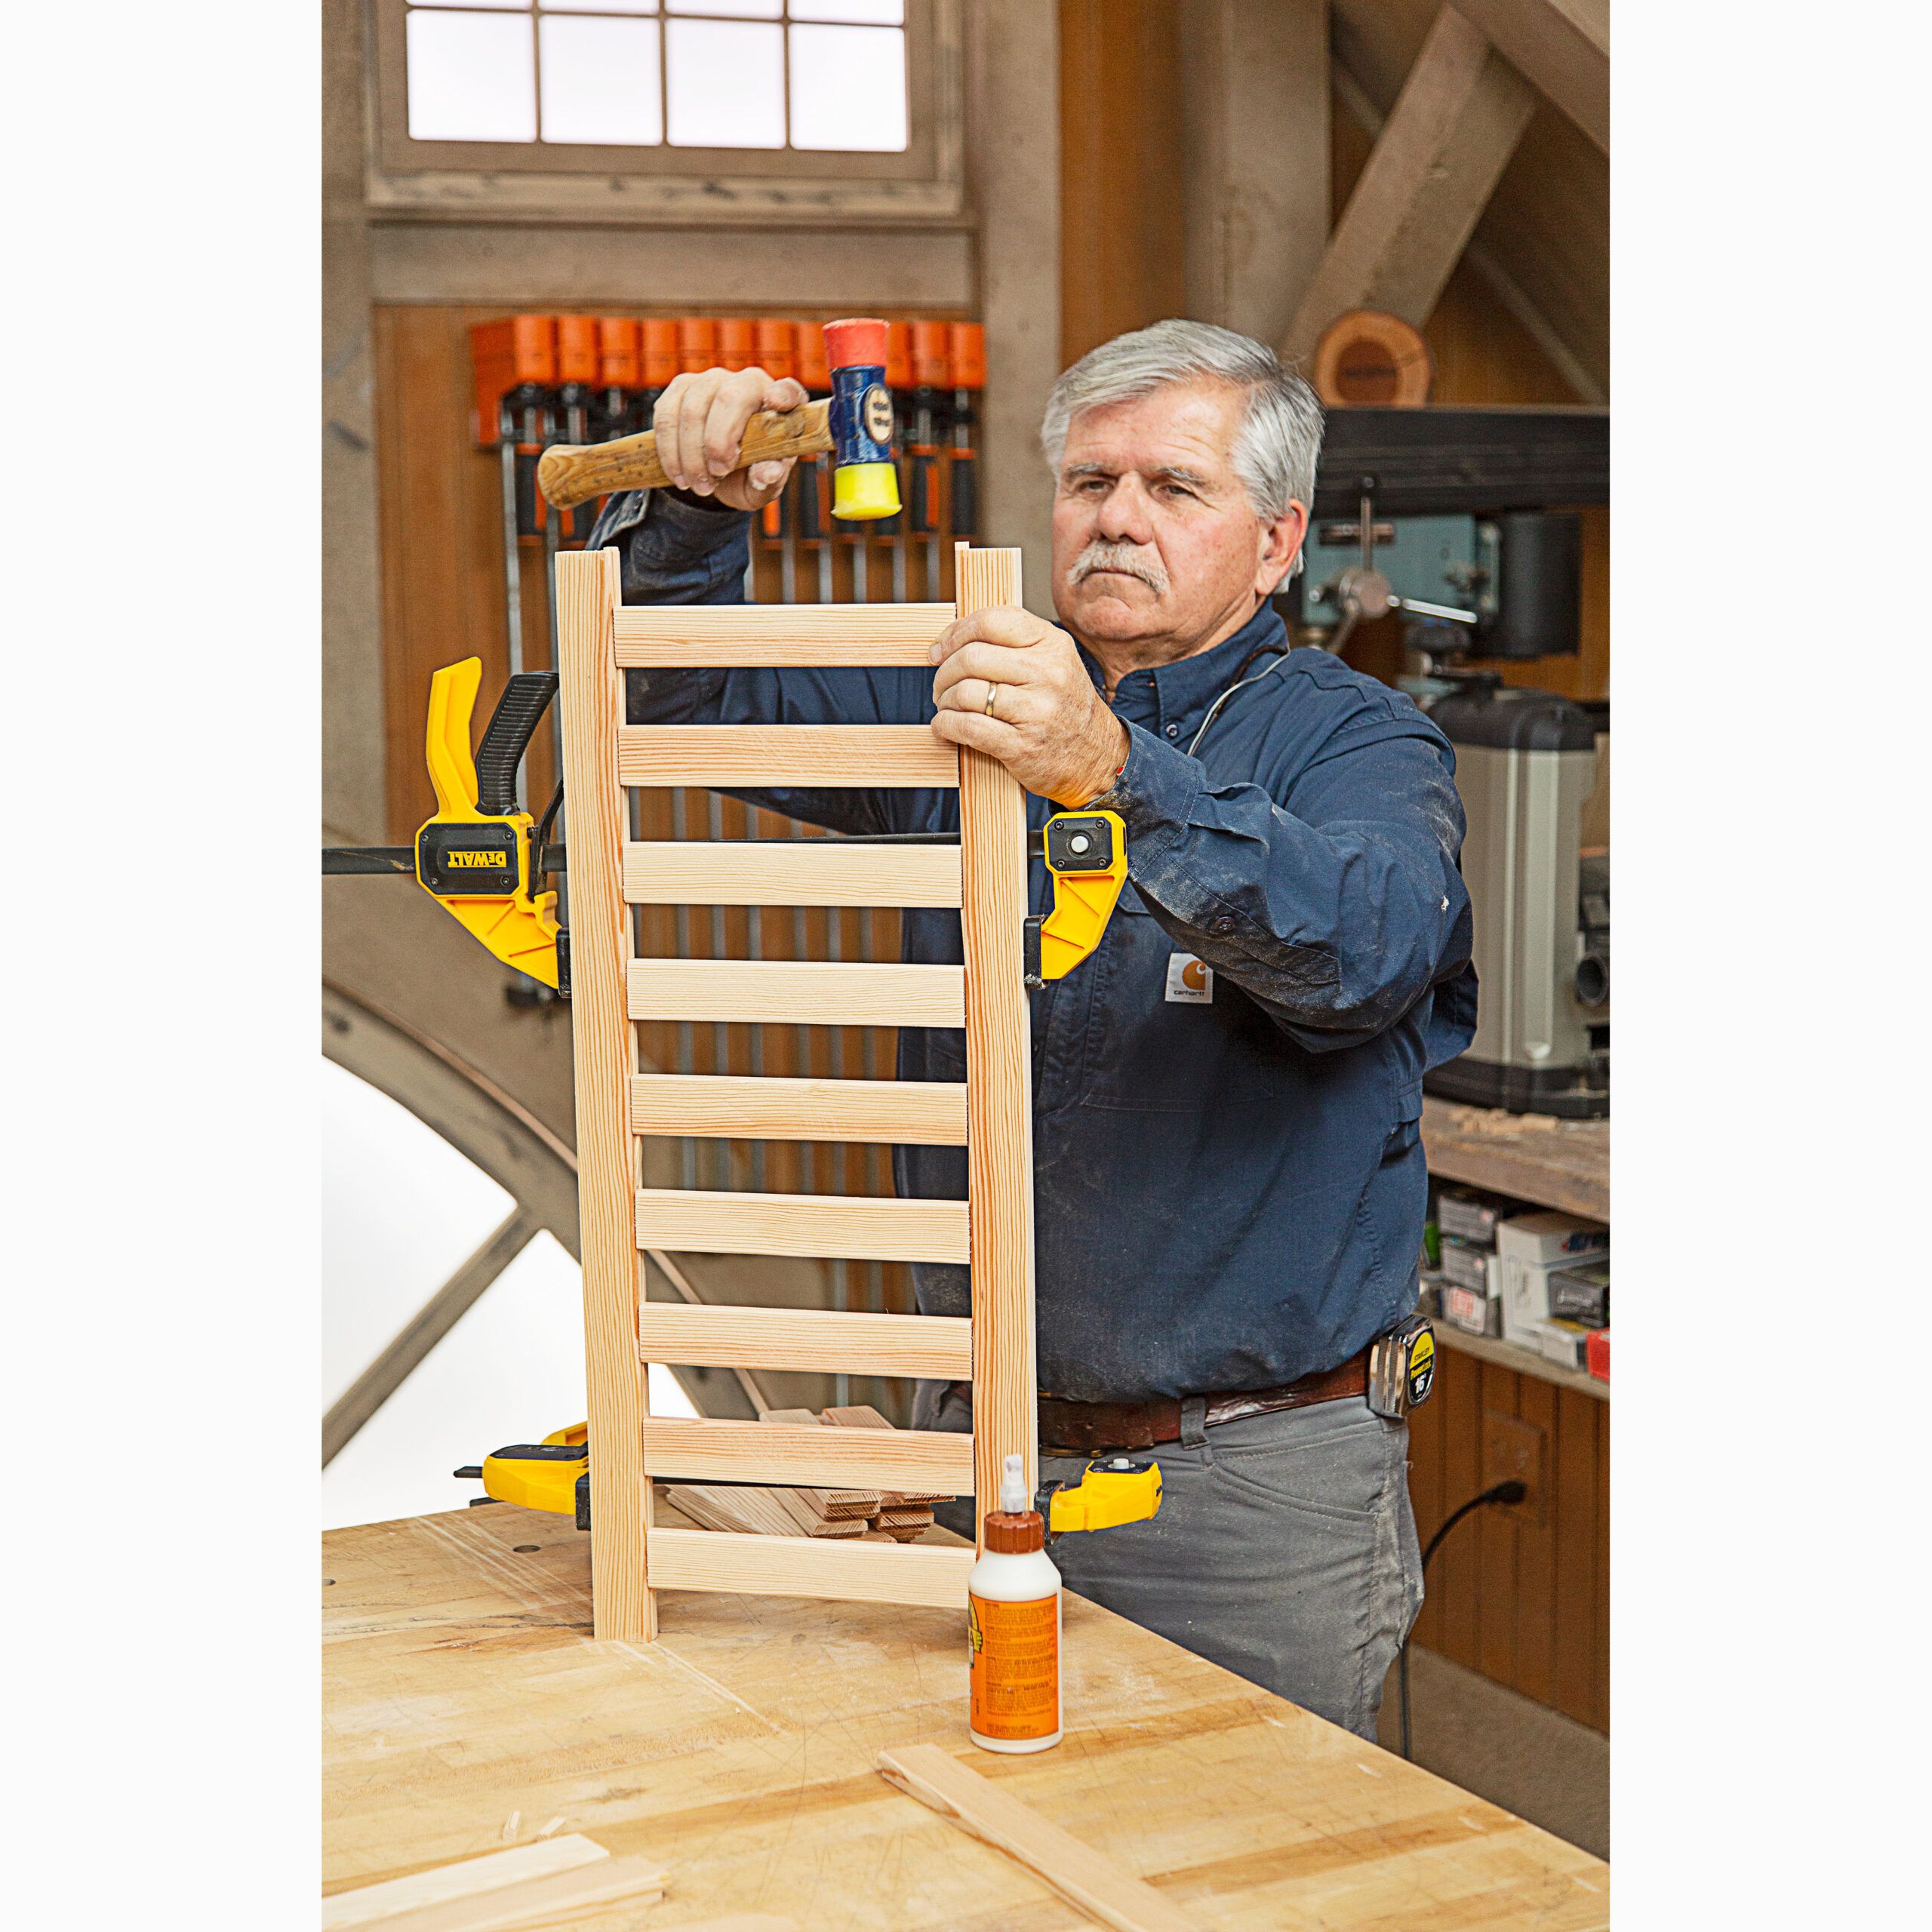
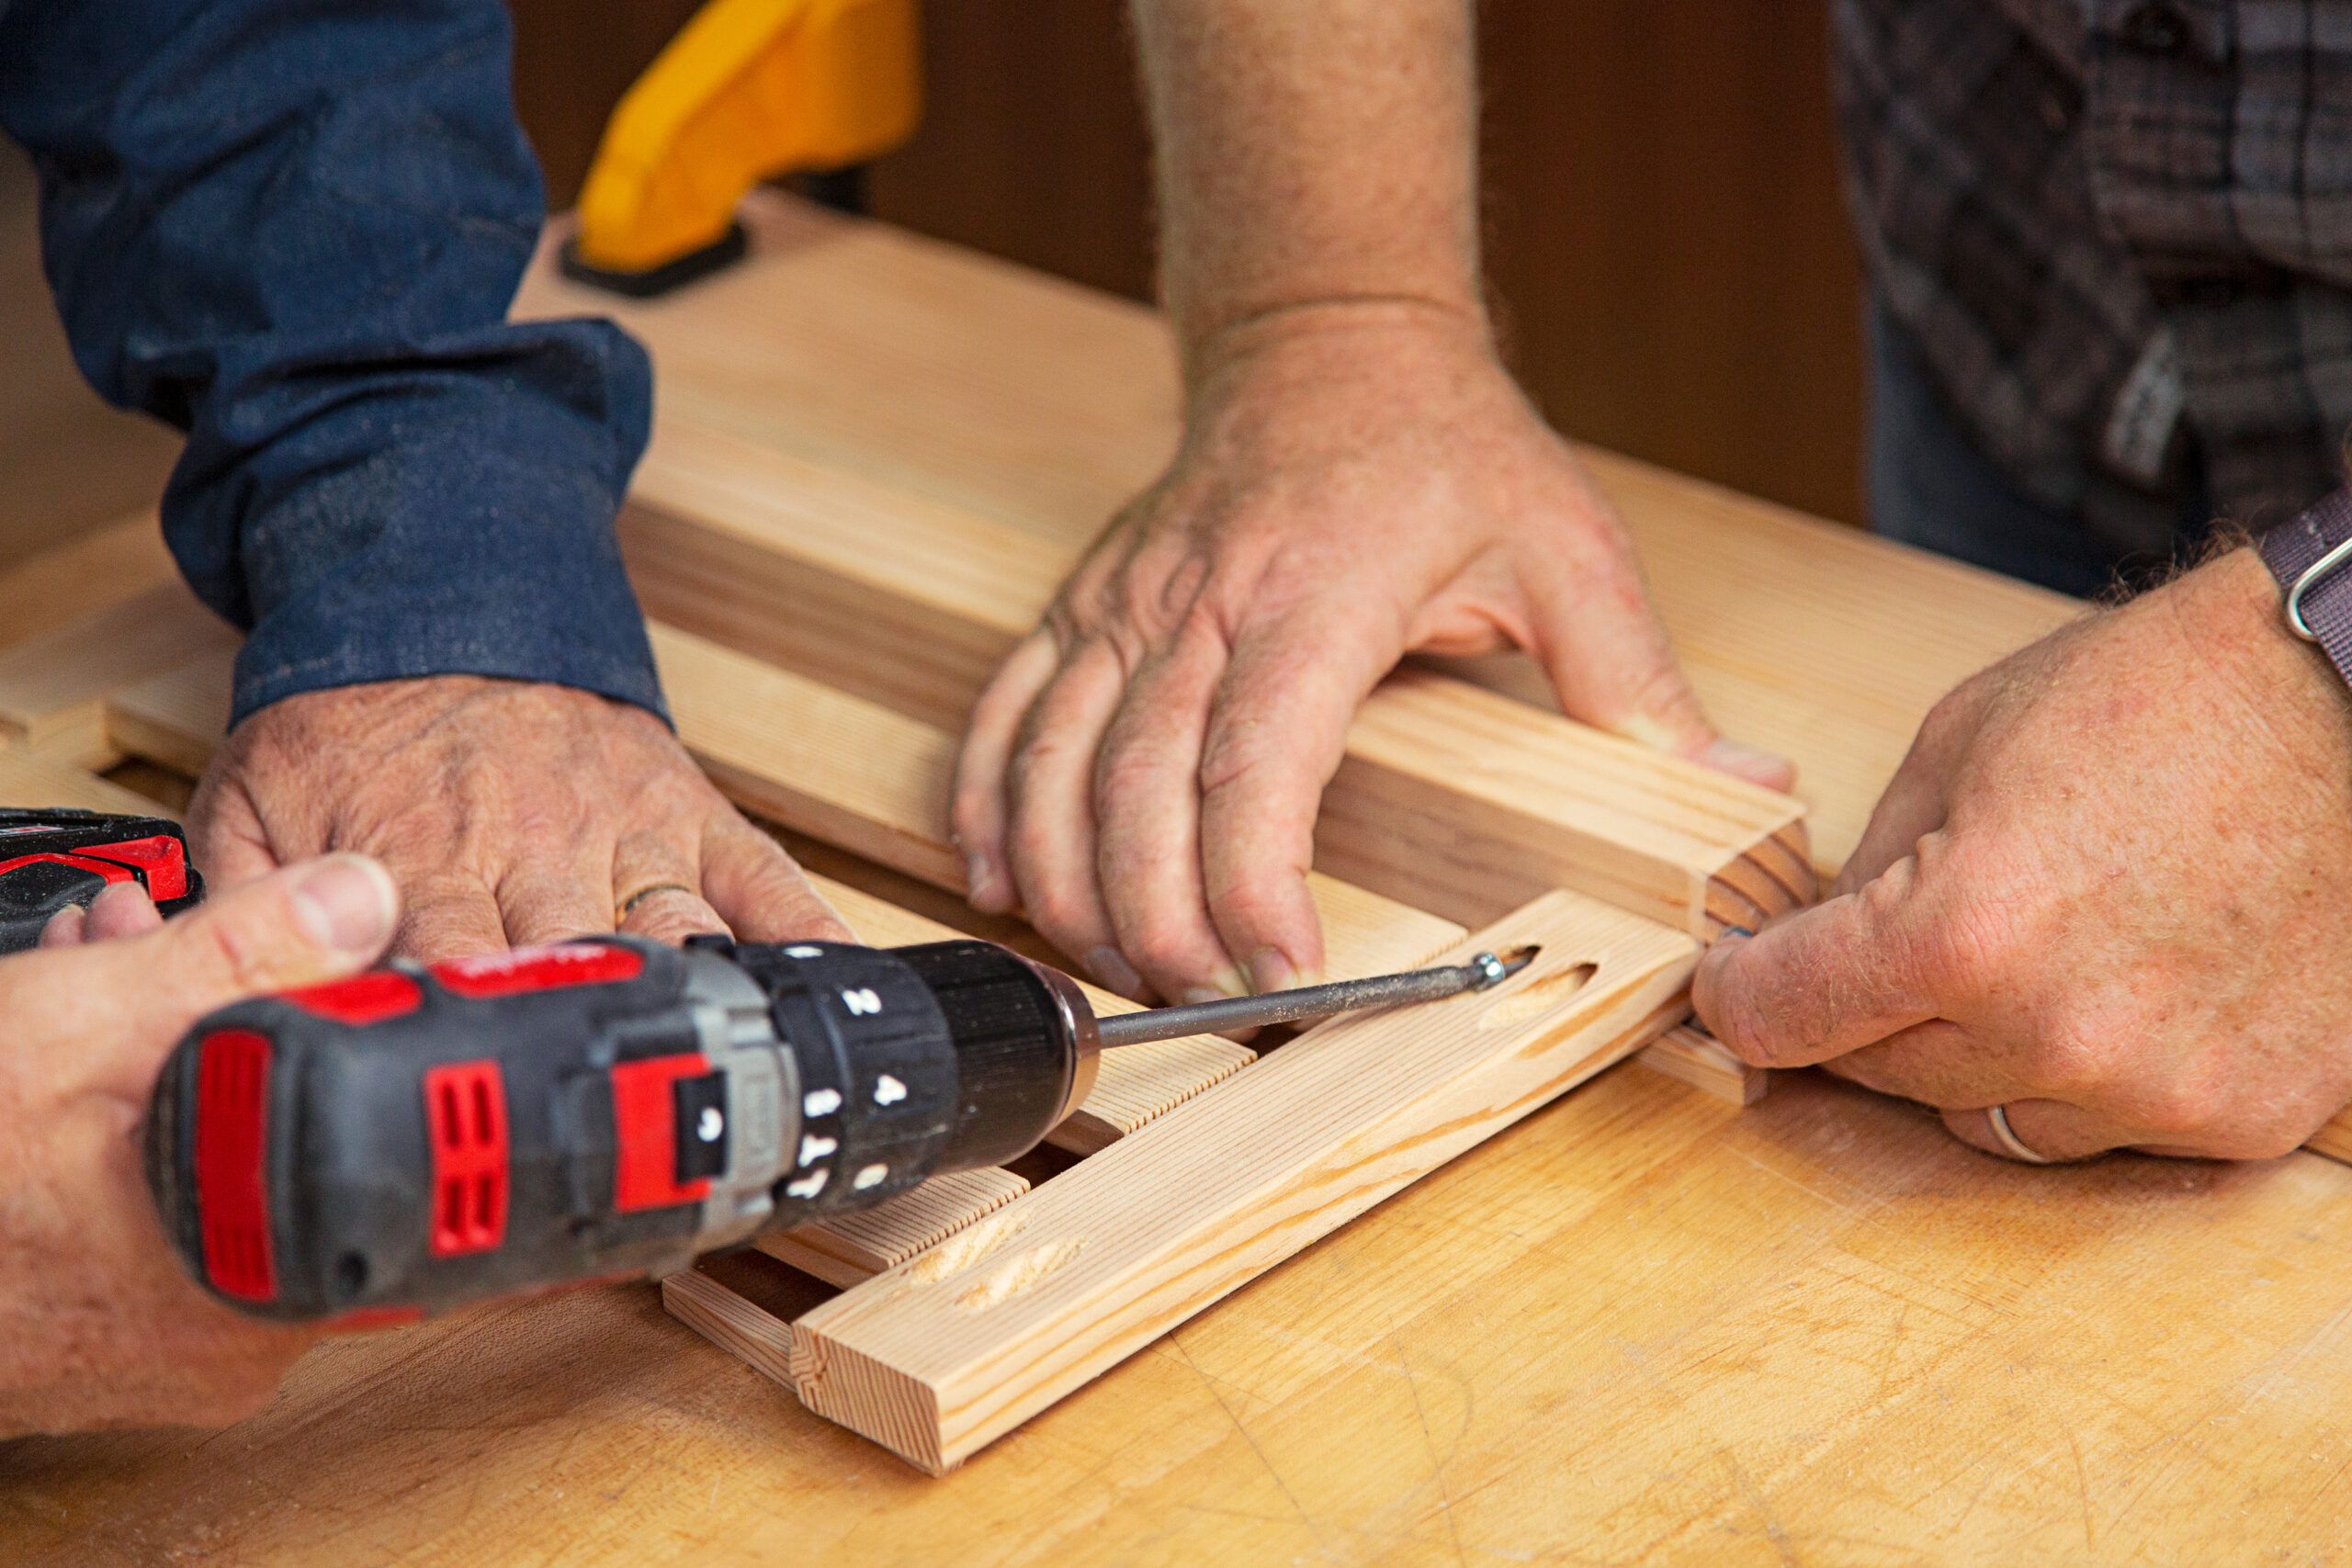
There’ll now be 4 pairs of rails with slots—one pair for each end panel and one pair for each shelf. Glue the rabbeted ends of the slats into the slots on one rail, then the other. Clamp collectively each slat-and-rail assembly and study that it’s sq.. A faucet with a mallet can sq. up a racked assembly.
4. Drill Holes for Pocket Screws
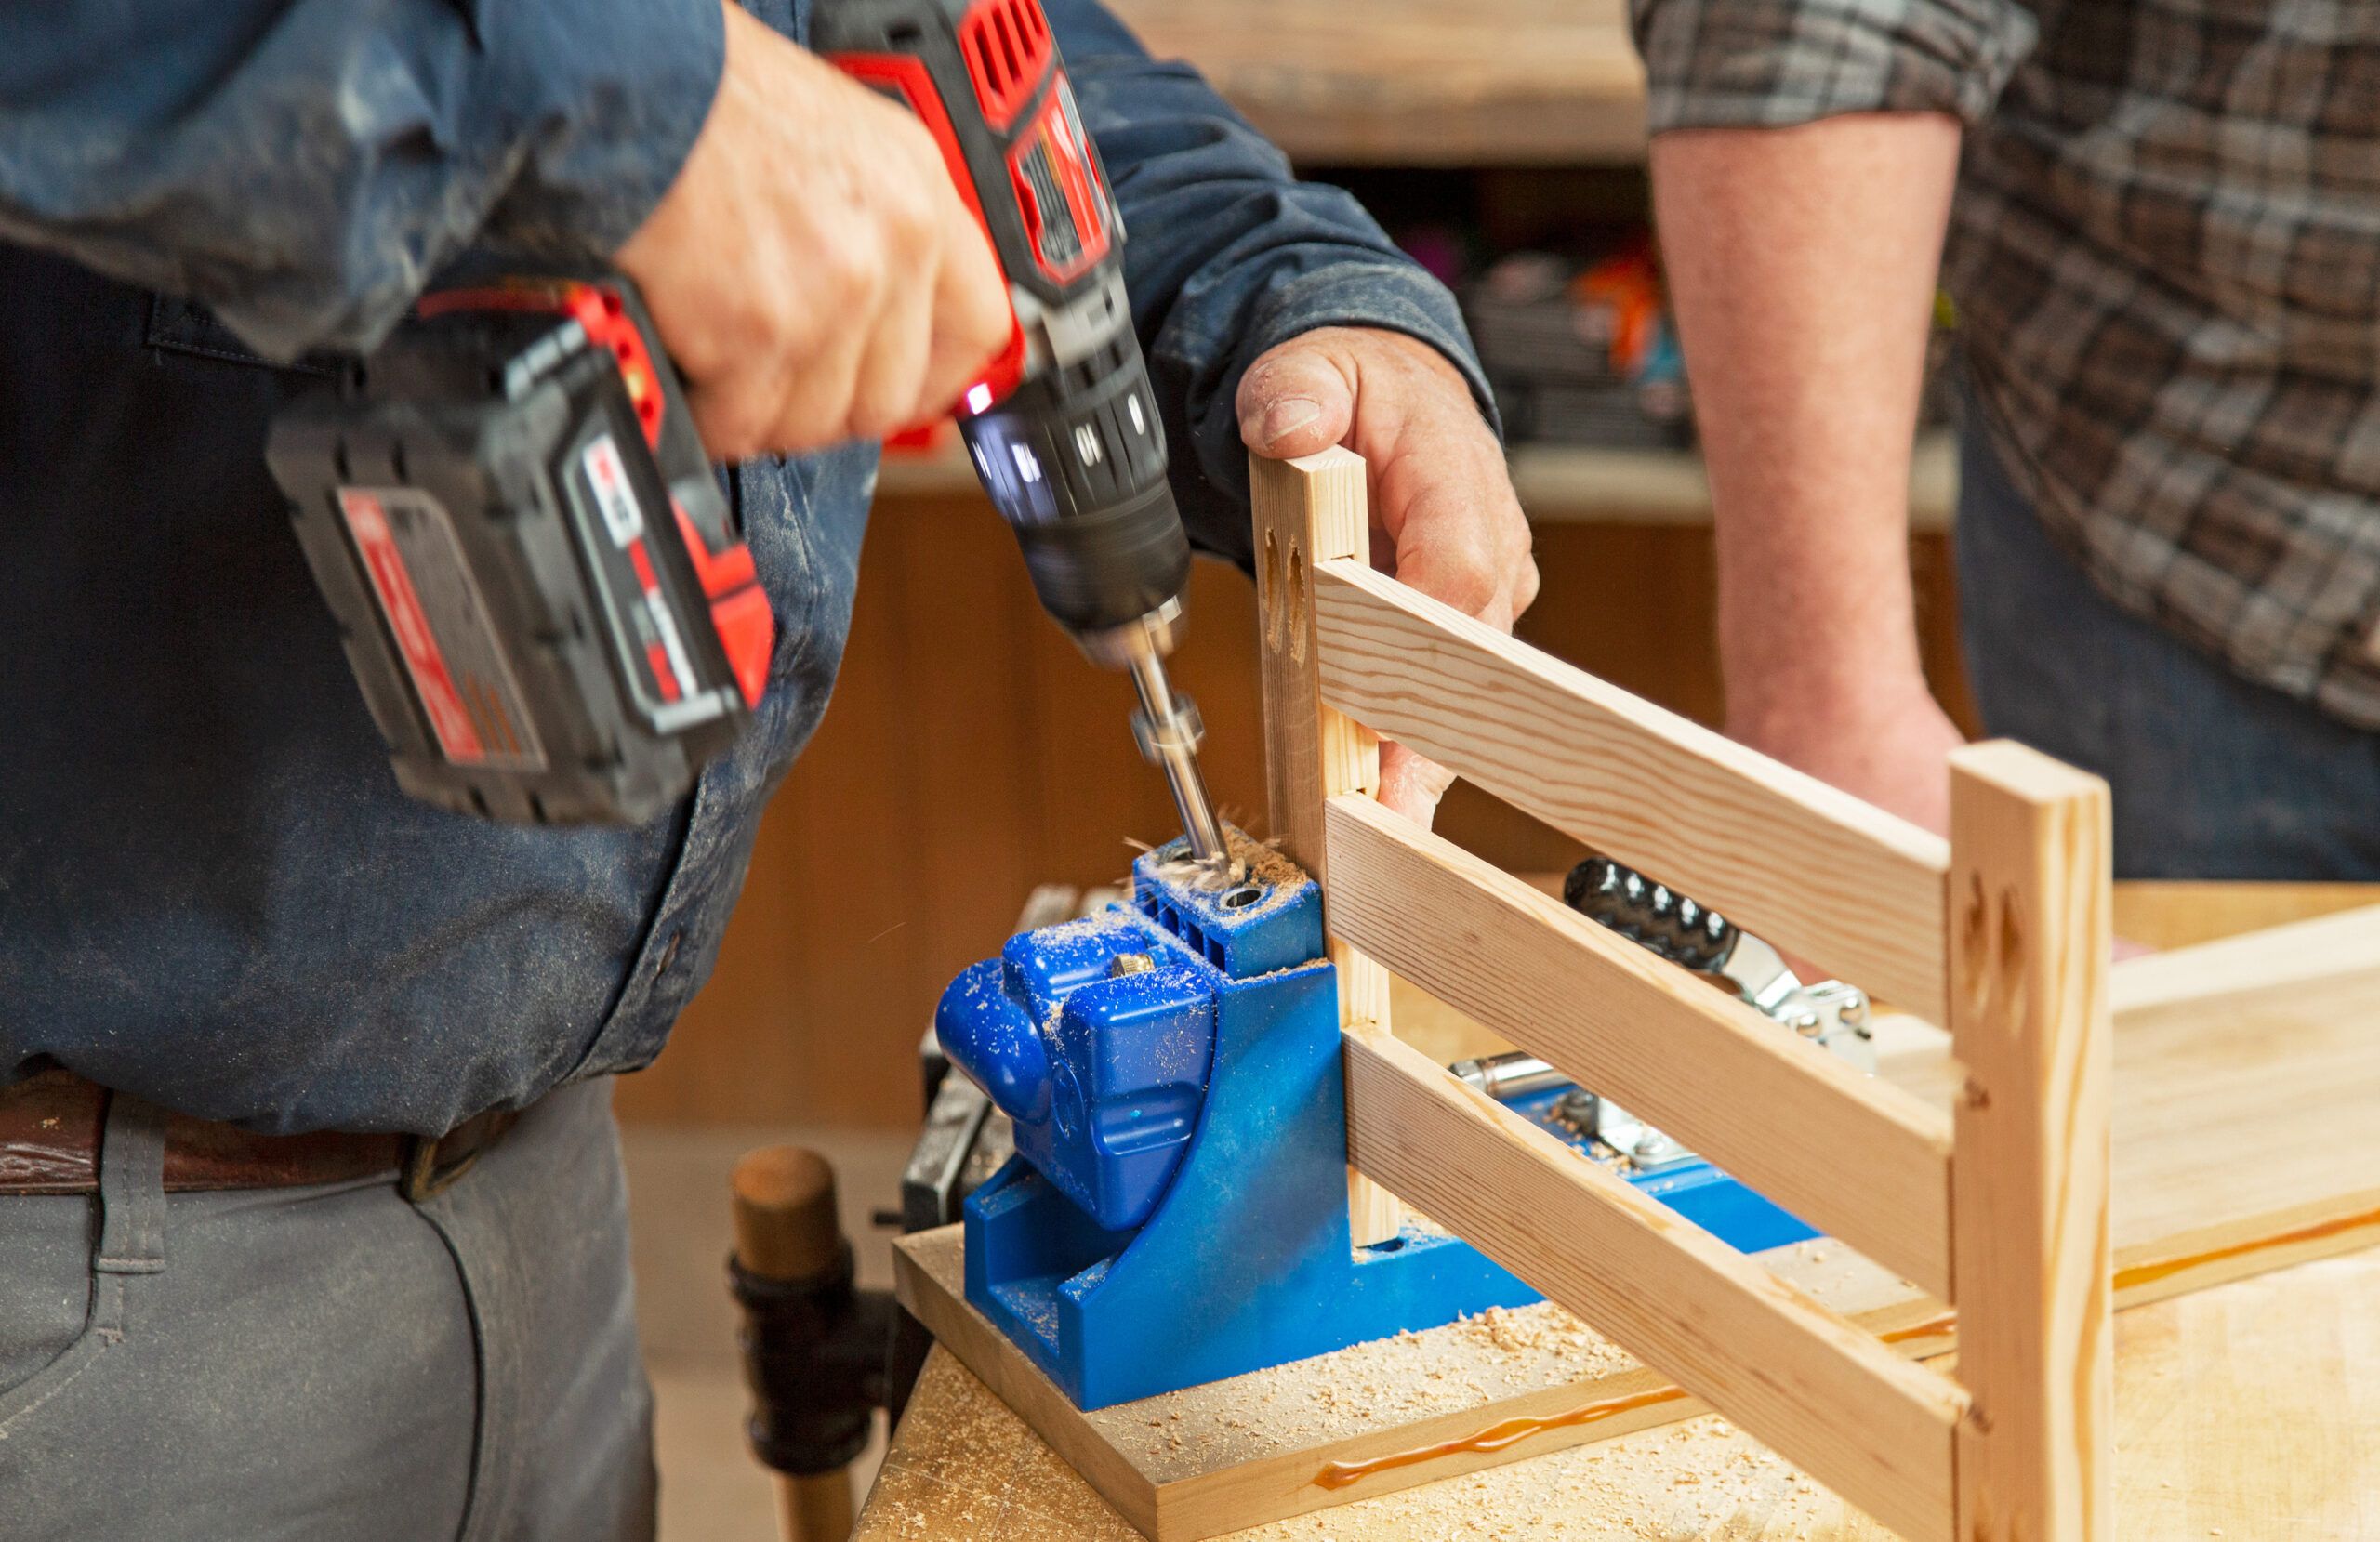
Clamp an end-panel rail proper right into a pocket-screw jig and drill two holes via the inside face of the rail’s end. Do the an identical for the rest of the panel rails and the undersides of the shelf rails and crosspiece. Drill three evenly spaced cross-grain holes inside the prime rails and two in the long term panels’ prime rails.
Tip: Pocket screws present a quick methodology to make sturdy no-glue joints the place wood gadgets meet at correct angles. The screws match into pilot holes drilled at a shallow, 15-degree angle by a specific stepped bit guided by the jig confirmed (Kreg Devices).
5. Add the Legs to the End Panels
Set one end panel on 1/2-inch-thick scraps, inside face up. Place a leg in the direction of the panel’s prime rail, then, using a drill/driver with a 6-inch-long bit, fasten the panel to the leg with two pocket screws, as confirmed. Do the an identical with the opposite leg. Join the other panel to its pair of legs the an identical methodology.
6. Join the Rails and Cupboards
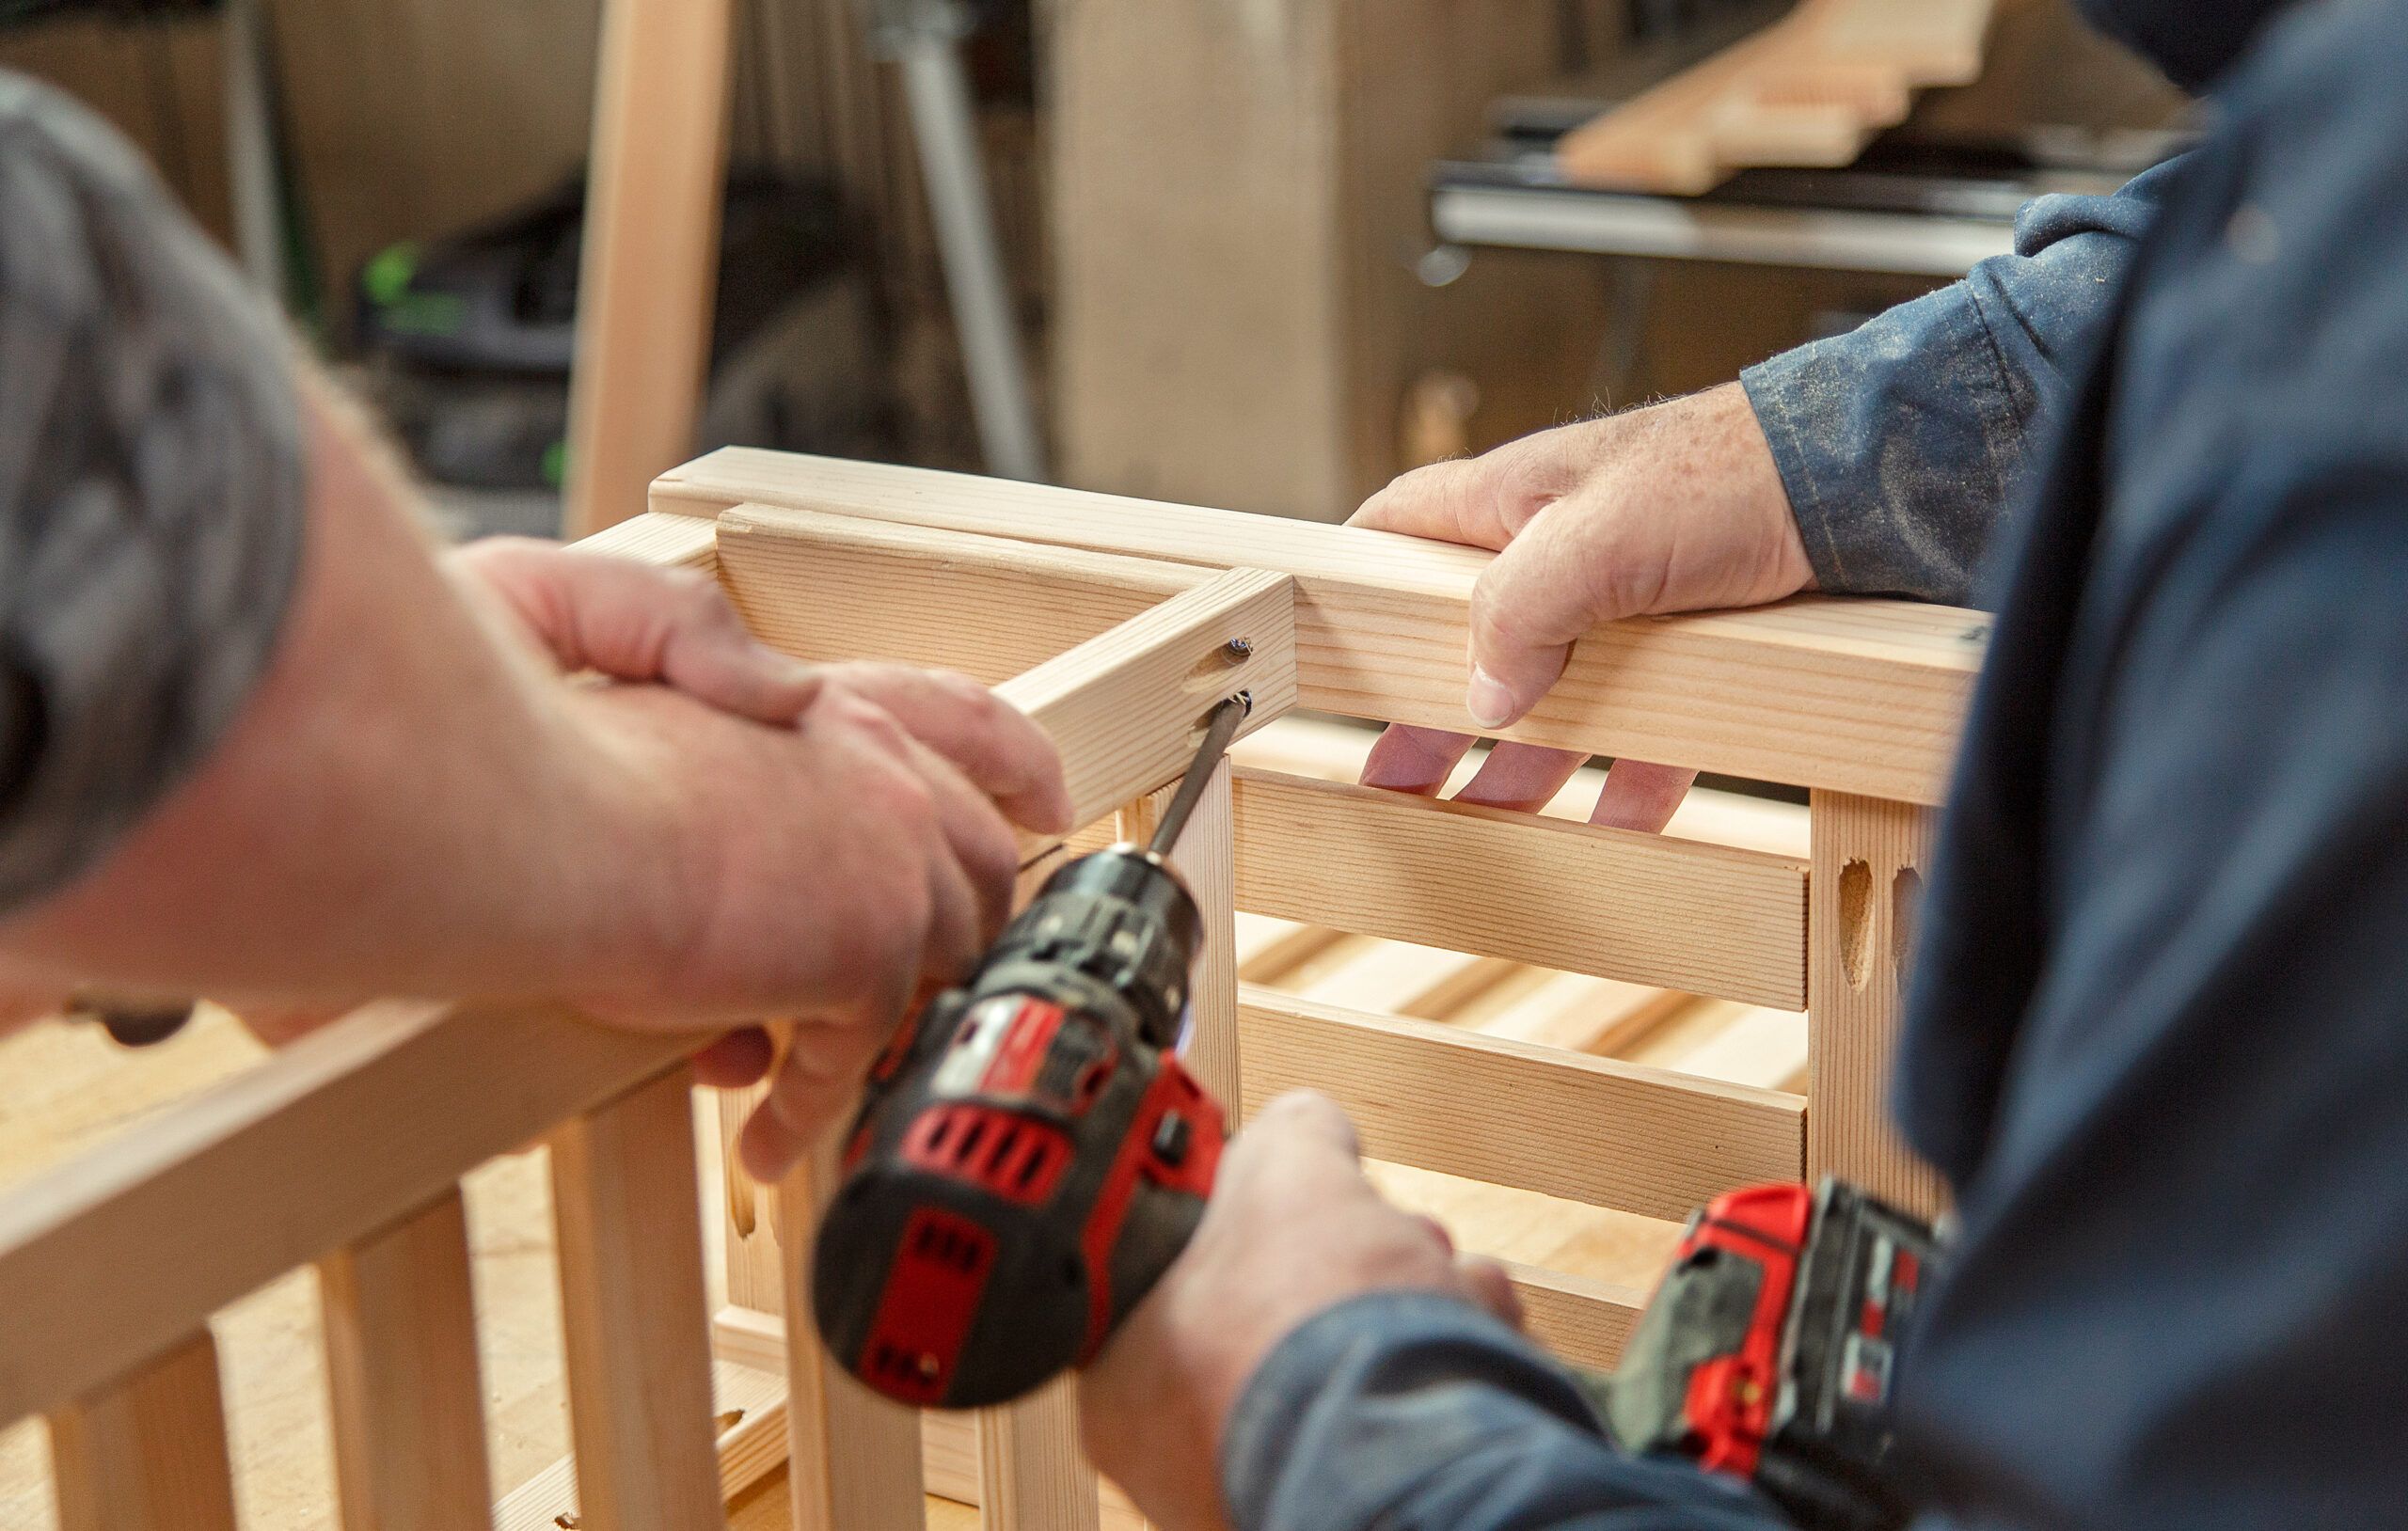
Screw the best rails to the end-panel legs. Maintain the rails flush with the legs’ tops. Inset them half an inch from the legs’ exterior faces. Fasten the crosspiece between the rails. Pocket-screw the cupboards to the legs. Use a 6-inch info block to set the spacing between the cupboards and underneath the best rails.
Tip: Washer heads on these screws seat in the direction of a “step” made contained in the outlet by the drill bit. The step ensures the joint may be tight with out splitting the wood or blowing via the piece being joined. Pocket screws are case-hardened to face up to breaking and take square-drive bits, which don’t slip.
7. Protected the Excessive
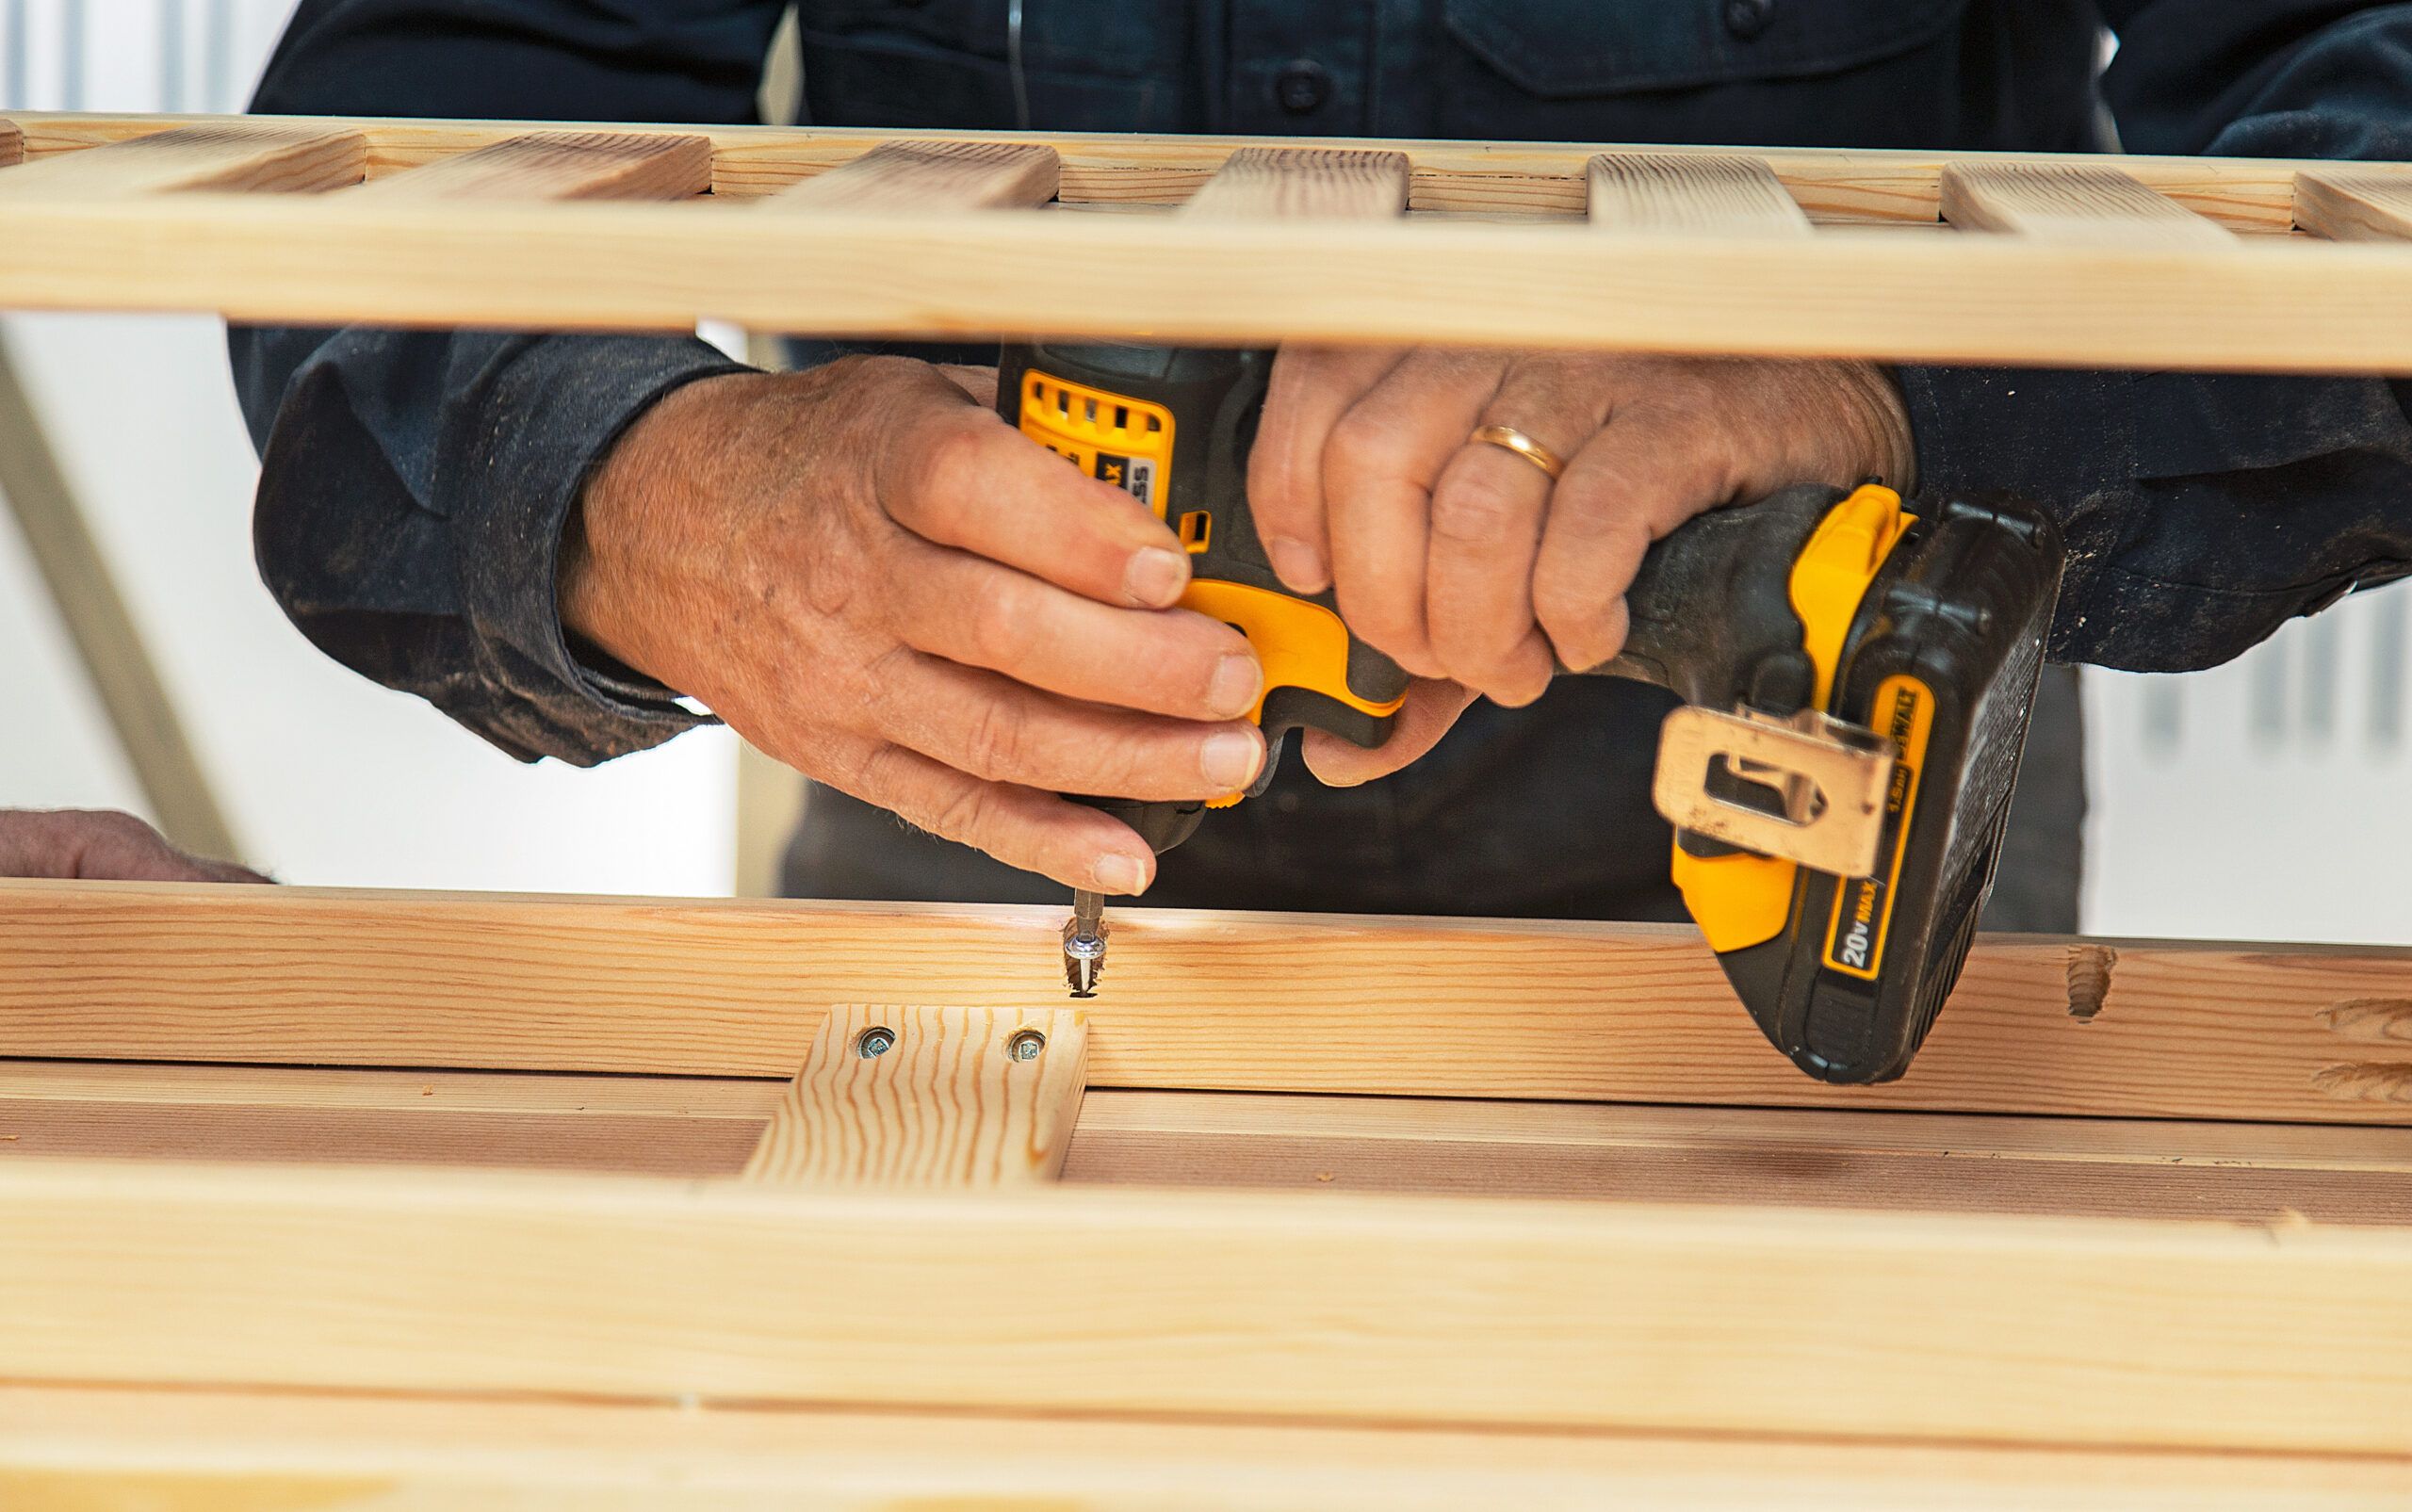
Lay 4 1-by-4s edge to edge in your work flooring. Center the rack’s base the flawed method up on them, with the legs 1 inch from their ends and edges. Take a look at that the underside is sq., then use the 1-inch bit to pocket-screw the crosspiece and the best rails, as confirmed.
8. Sand the Excessive
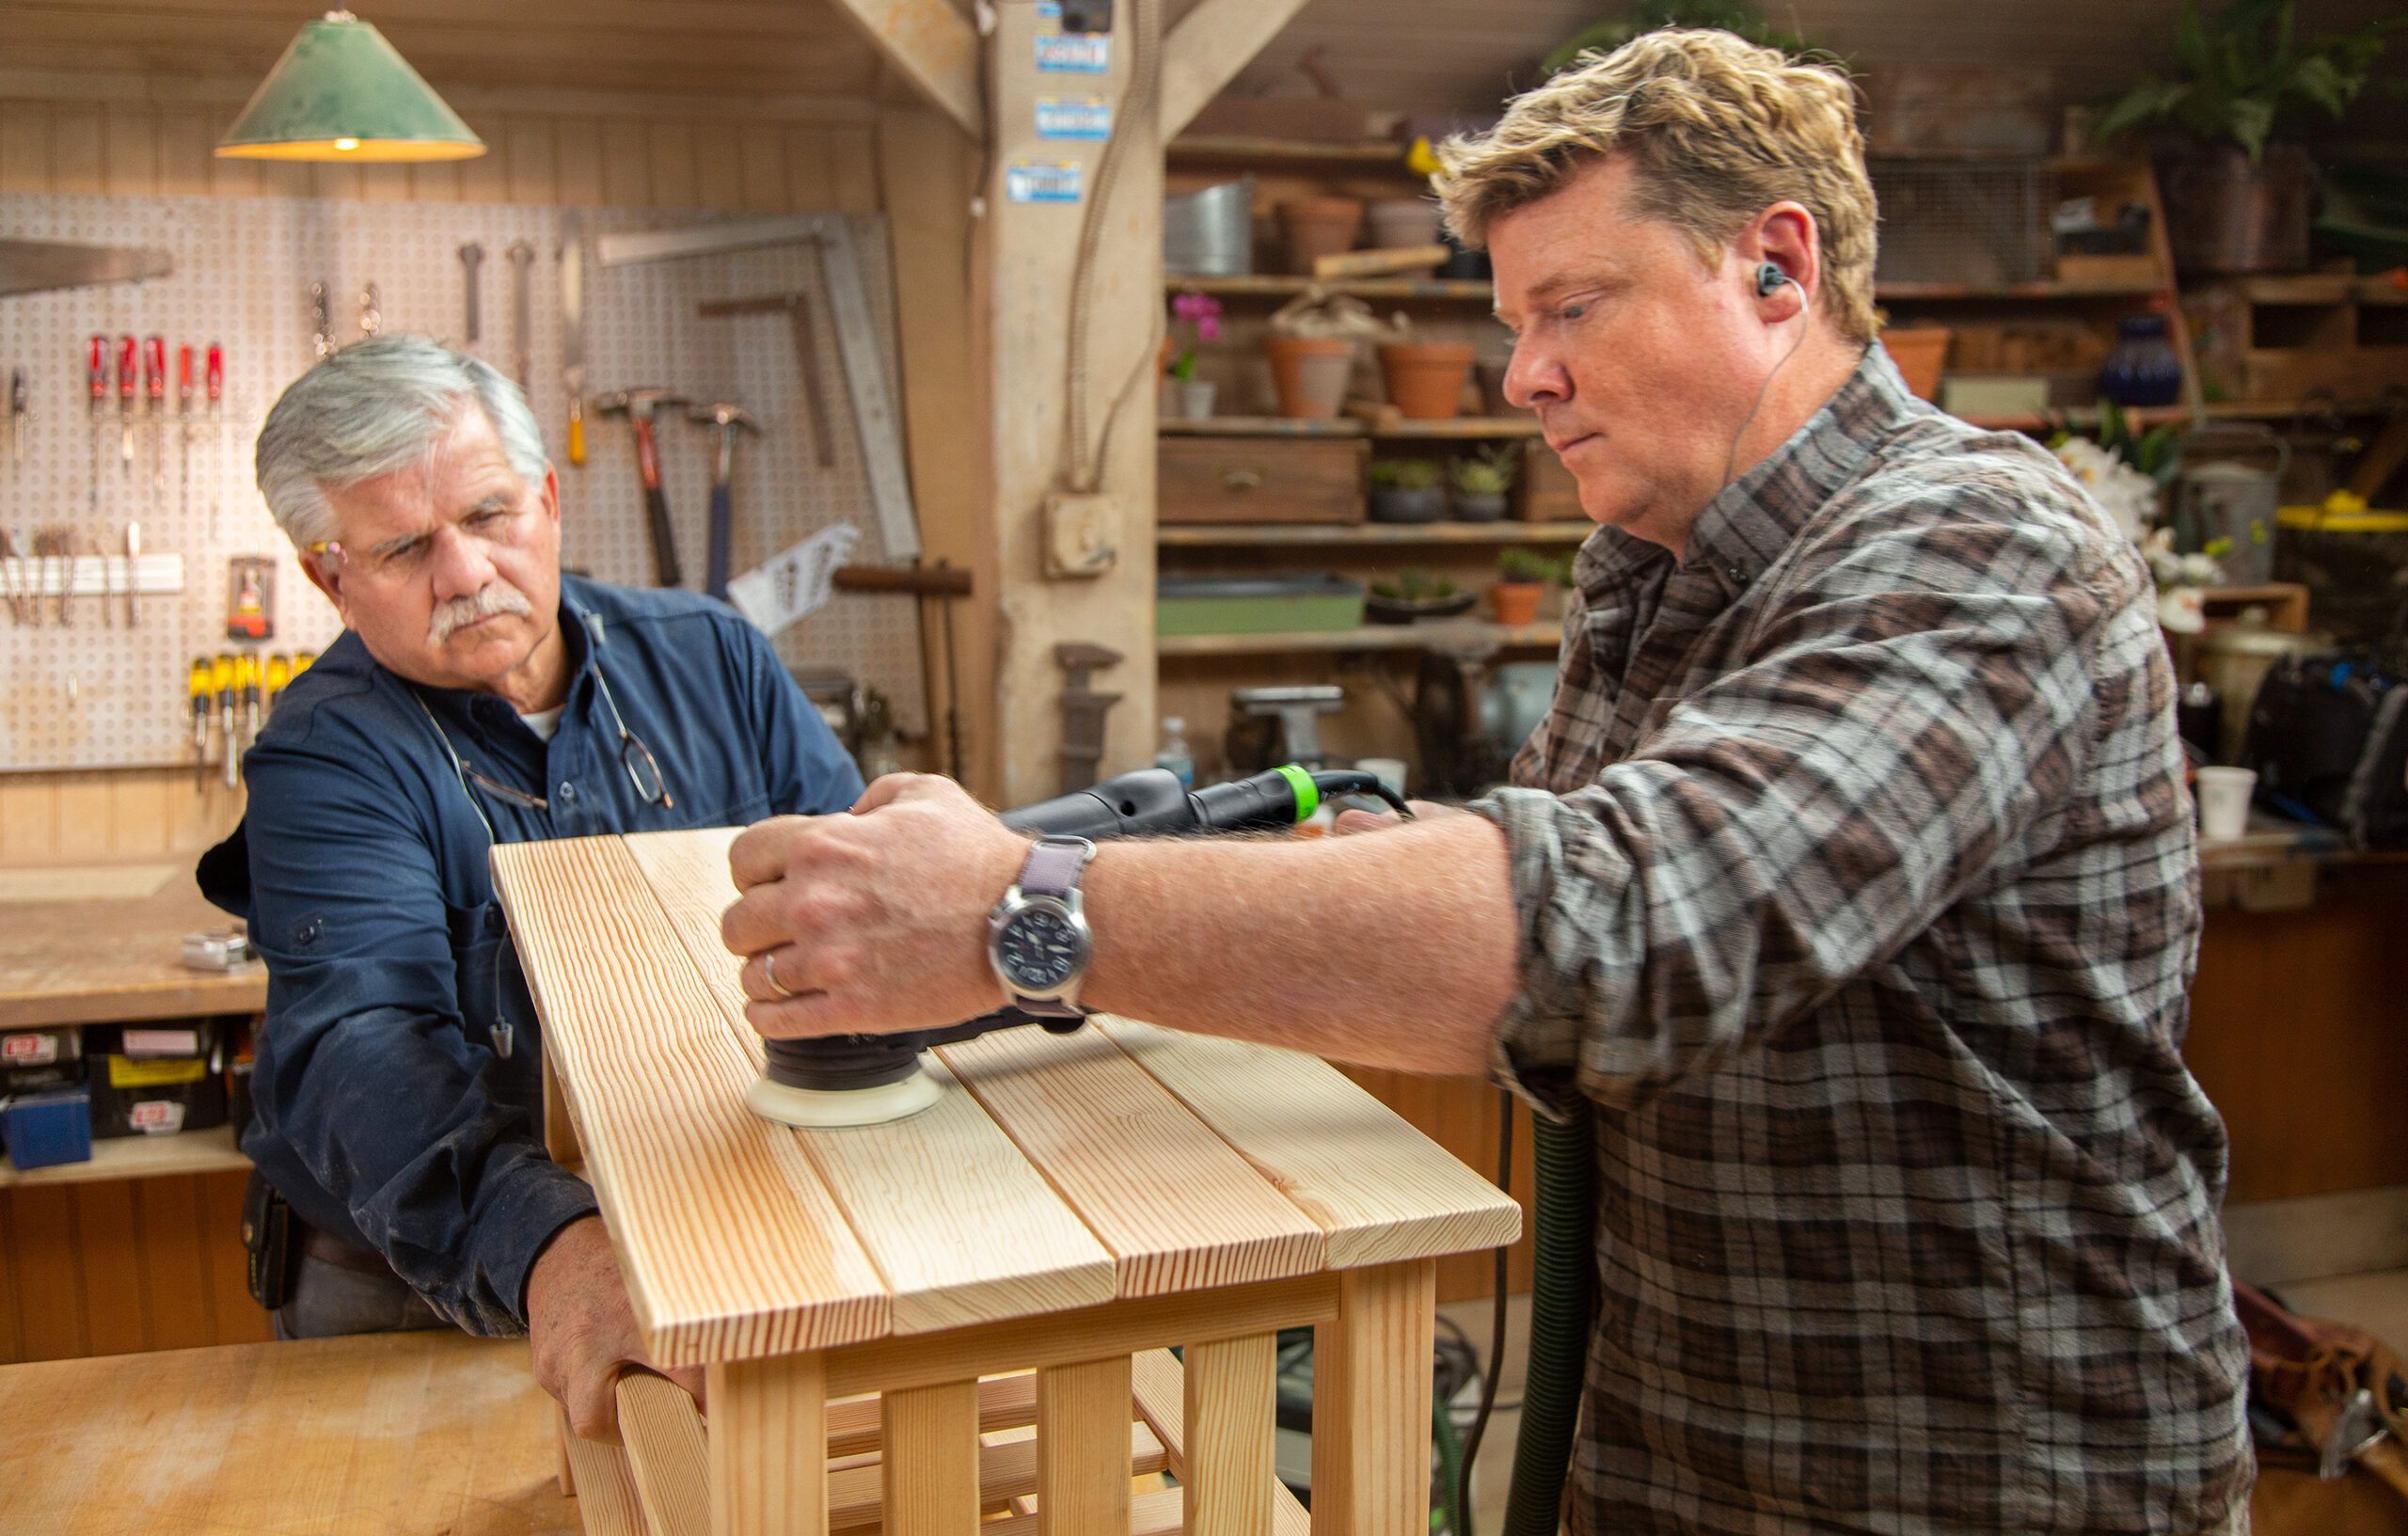
Starting with an 80-grit sanding disk, sand all of the prime: face, ends, and edges. Proceed with successively finer grits—100, 120, 150, 220, then 320—to rearrange the best for a clear finish. For individuals who plan to paint the bench, stop sanding after 220-grit.
9. Protect With Poly
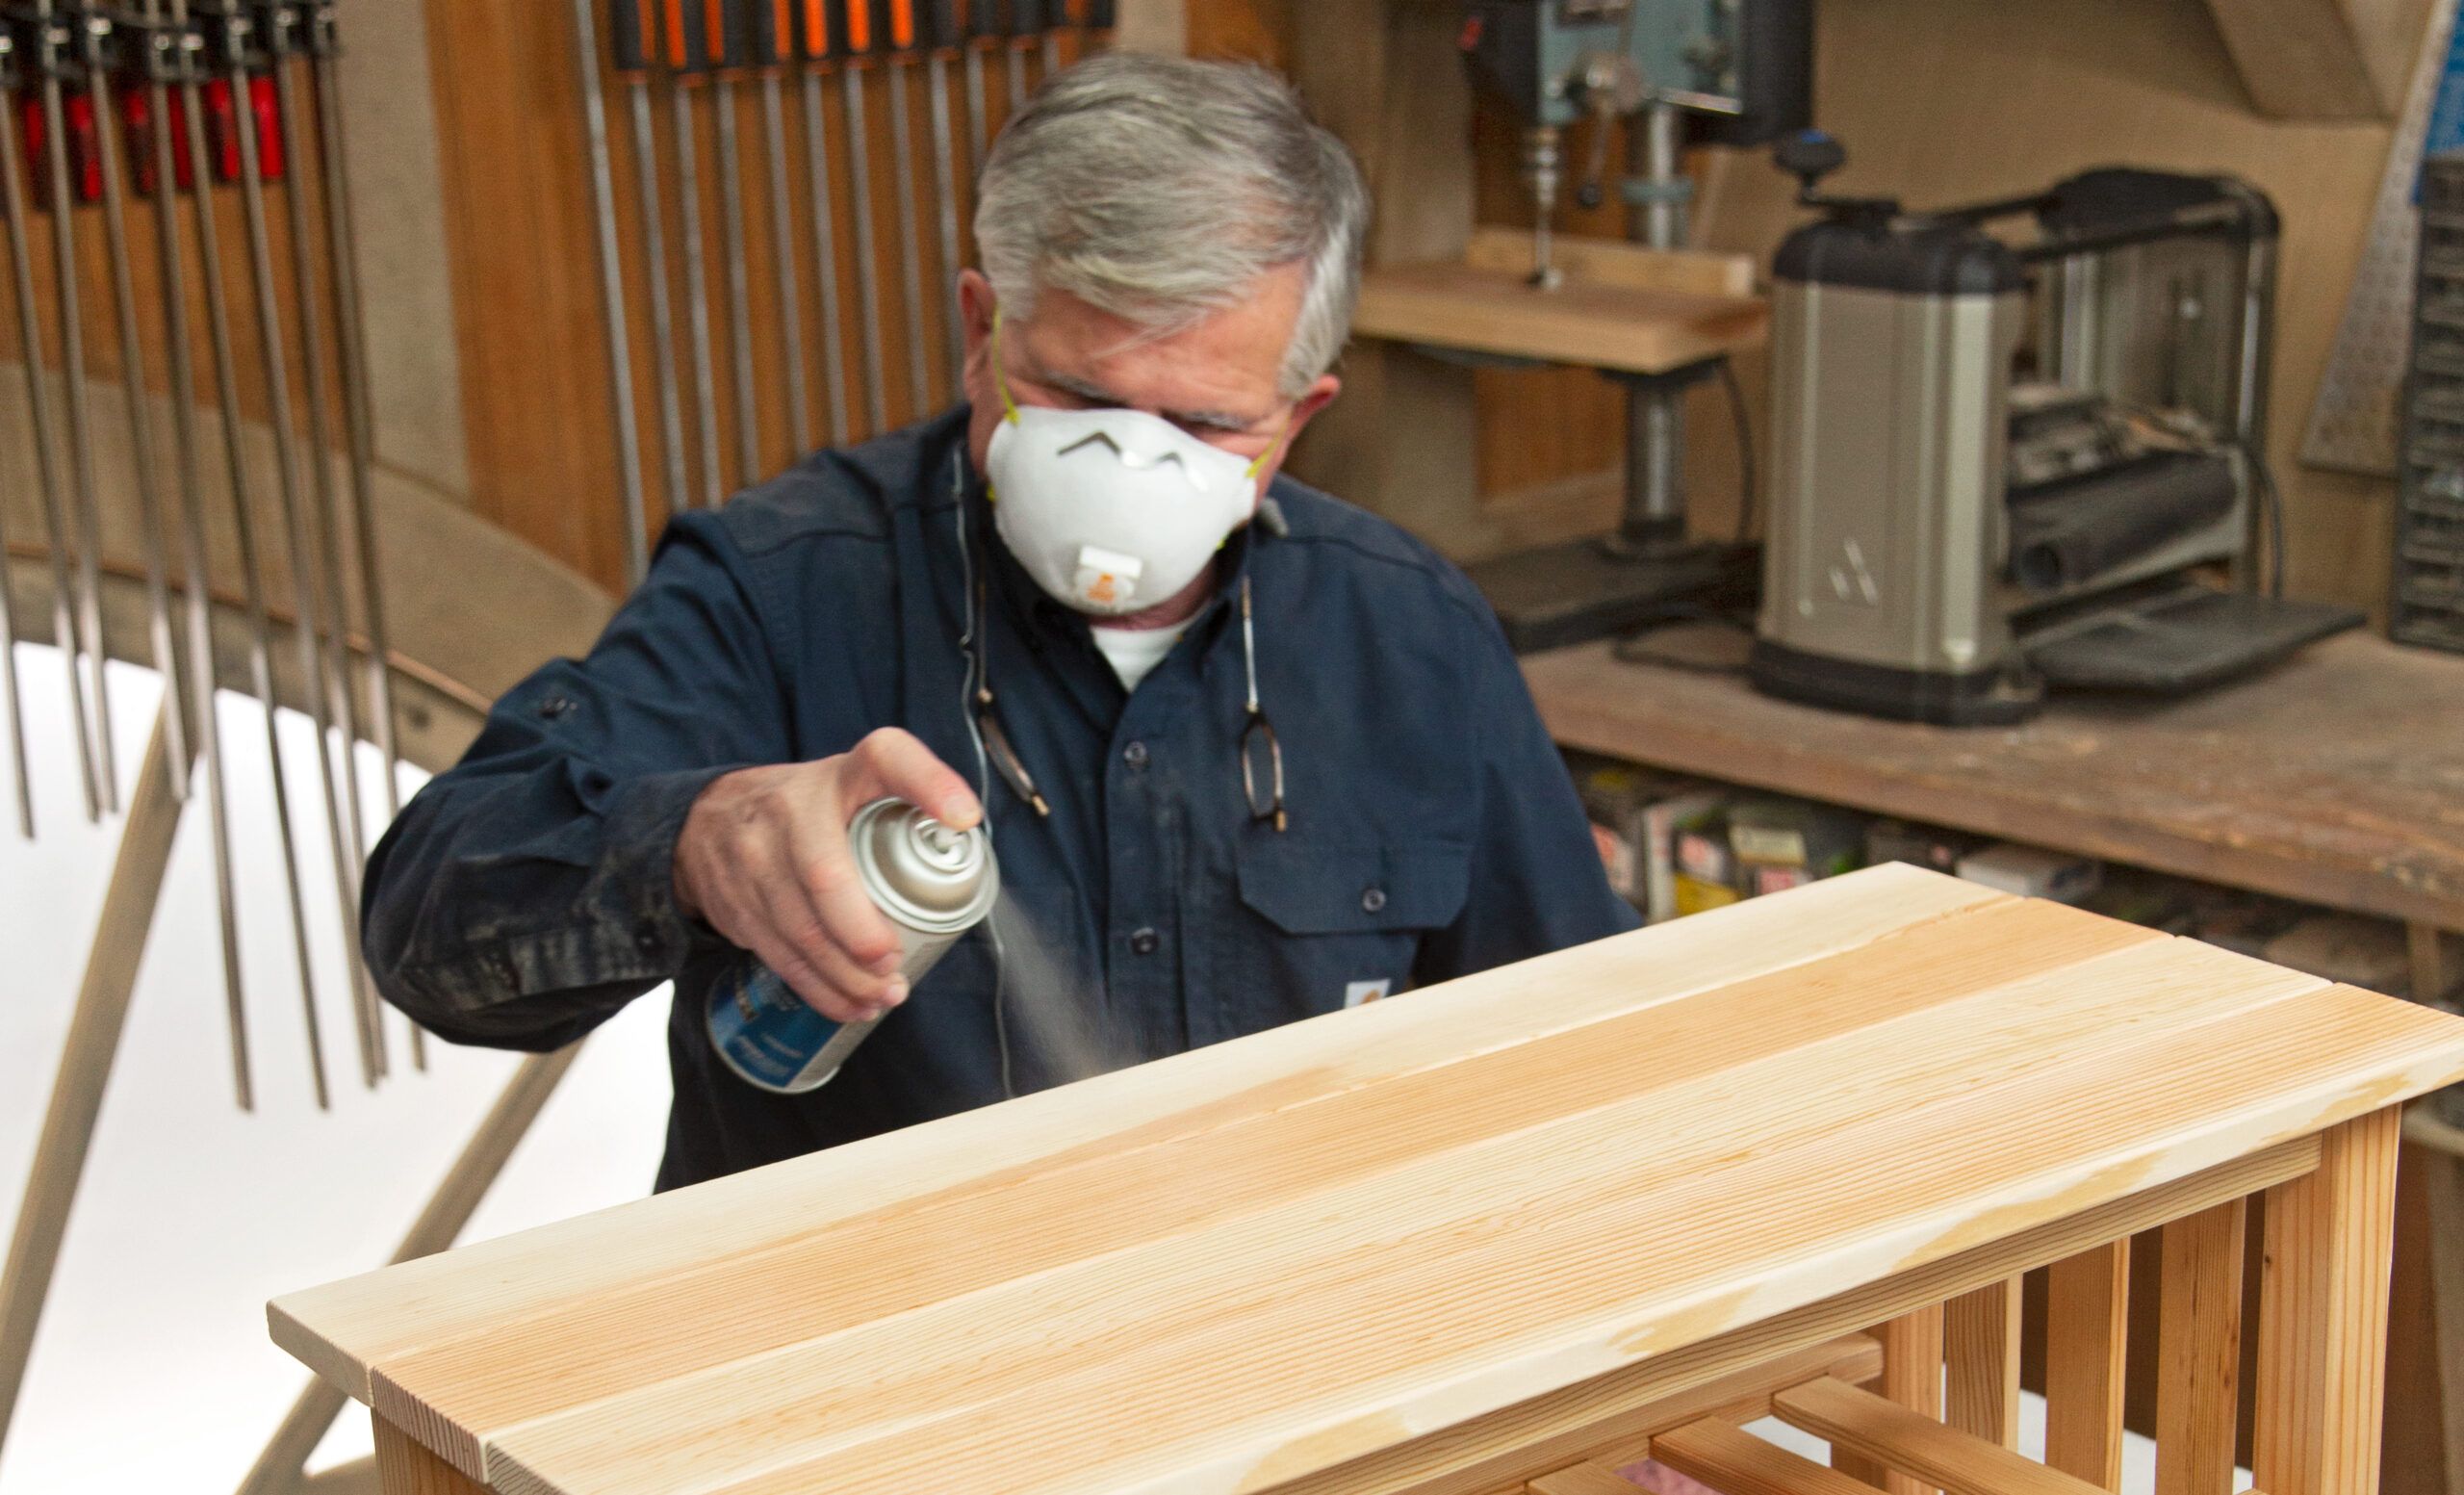
Mud off every flooring, then go over them as soon as extra with a tack materials. On account of Silva was working indoors, he opted for a water-based polyurethane, and for the reason that bench has so many uncovered surfaces, he chosen to spray on the top for an entire of three coats.
Superior Methods and Concepts for Your Shoe Rack Bench
For those who want to take your enterprise a step further, ponder the following strategies and ideas:
- Enhanced stability: To ensure most stability and longevity, reinforce the joints with additional wood glue, even when using pocket screws. This may current added vitality, notably if the bench may be carefully used.
- Decorative touches: Decorative components corresponding to routered edges, carved particulars, or inlays can add distinctive character to your piece. Bear in mind to sand any added components completely to maintain a clear finish.
- Totally different woods: Whereas Douglas fir is an effective choice for its stability and look, completely different hardwoods corresponding to oak or maple may be utilized to match your property’s inside decor. For sure hardwoods might require completely completely different ending strategies to realize the desired look.
- Storage choices: If additional storage is a priority, ponder together with drawers or baskets beneath the seat. Using the realm beneath can rework your bench proper right into a further versatile storage unit, glorious for small entryways.
Sustaining Your Shoe Rack Bench
As quickly as your shoe rack bench is full, protect it working and looking its most interesting with these care pointers:
- Widespread cleaning: Mud the bench weekly and clear spills promptly to stay away from stains. Use a moist materials for cleaning and stay away from harsh chemical compounds which will harm the top.
- Periodic resanding: Over time, placed on and tear might boring the ground of your bench. Flippantly resand with fine-grit sandpaper and reapply a coat of polyurethane to revive the distinctive shine.
- Inspecting joints: Usually study the joints for any indicators of loosening. Tighten screws if wanted and apply glue to bolster weak spots. Guaranteeing the bench stays sturdy will extend its lifespan.
- Avoiding direct daylight: Place the bench away from direct daylight to forestall fading and drying out. Extreme temperatures might set off the wood to crack.