
We may be compensated if you’re going to purchase via hyperlinks on our site. Our Opinions Workers is devoted to delivering reliable, purpose, and unbiased evaluations on home companies and merchandise.
Setting up a three-tiered tub stand is an effective manner in order so as to add storage and magnificence to your toilet. This do-it-yourself (DIY) mission is good for these searching for to enhance their space with a custom-made piece that’s every sensible and interesting. On this data, we stroll you through the strategy of creating a compact, moisture-resistant stand which will slot in nearly any toilet, providing straightforward accessibility to your vital objects.
Understanding the Three-Tiered Bathtub Stand Problem
Sooner than starting constructing, it’s important to know the scope of this mission. That may assist you put collectively, let’s break down the vital factor factors.
Expertise Diploma Required
This mission is rated one out of 5 on the expertise diploma scale, making it final for freshmen or these with restricted woodworking experience. The event course of consists of elementary methods much like measuring, lowering, and assembling, which are manageable for a lot of DIY lovers.
Estimated Time Physique
You probably can anticipate to complete this mission in about three days. This timeline permits for the event course of and drying time for glue and finishes. Working at a comfortable tempo will assure a well-crafted closing product.
Vital Provides and Devices
Gathering the perfect provides and devices is crucial for a clear setting up course of. Underneath is what you’ll need to get started.
Picket and {{Hardware}} Components
- 3/8-inch picket plugs
- One 5/8-inch stainless-steel trim-head screw
- Sturdy picket boards (for legs, aprons, cleats, and slats)
- Tile spacers (3/16-inch)
- Two 1/2-inch stainless steel deck screws
- Picket glue
Compulsory Devices for Constructing
- Bar clamps
- Combination countersink drill bit (3/8-inch)
- Drill/driver
- Miter observed
- Safety gear (goggles, mud masks, listening to security)
- Sandpaper (diversified grits)
- Tape measure
Preparing for Three-Tiered Bathtub Stand Constructing
Right preparation is significant to a worthwhile assemble. Sooner than you begin, take the time to familiarize your self with the mission particulars.
Learning and Understanding the Plans
Fastidiously overview the free plans and decrease itemizing on the market for this mission. This knowledge provides detailed measurements and assembly instructions. Phrase any specific cuts or joints required for each bit.
Setting Up Your Workspace
Clear a well-ventilated area with ample space to work comfortably. Assure you’ve got a sturdy work flooring and good lighting. Prepare your devices and provides for easy entry in the midst of the setting up course of.
Setting up the Three-Tier Shelf Frames
The shelf frames variety the muse of your tub stand. Adjust to these steps to create sturdy and precise frames for each tier.
Establishing the Bottom Shelf

Begin by creating the physique for the underside shelf. Glue and screw a cleat to each of the two apron objects, guaranteeing they’re flush alongside one edge. Center the apron between the ends of the cleat. Repeat this course of for the other two sides of the underside shelf physique.
Assembling the Middle Shelf
Assemble the middle shelf physique using the equivalent course of because the underside shelf. Pay attention to the scale specified by your plans, as the middle shelf may need barely completely totally different measurements.
Creating the Excessive Shelf Physique
The best shelf physique requires the identical technique, nonetheless you’ll go away the slats off for now. This physique shall be linked in a later step, so take care of making a sturdy base that may assist the face physique and slats.
Attaching the Bathtub Stand Legs
Alongside along with your shelf frames ready, it’s time to connect them with the legs, giving your tub stand its peak and building.
Marking Leg Positions
Fastidiously mark the locations for the underside and middle cupboards on all 4 legs. These marks will data you in positioning the cupboards precisely all through assembly.
Securing Legs to Bottom and Middle Cupboards
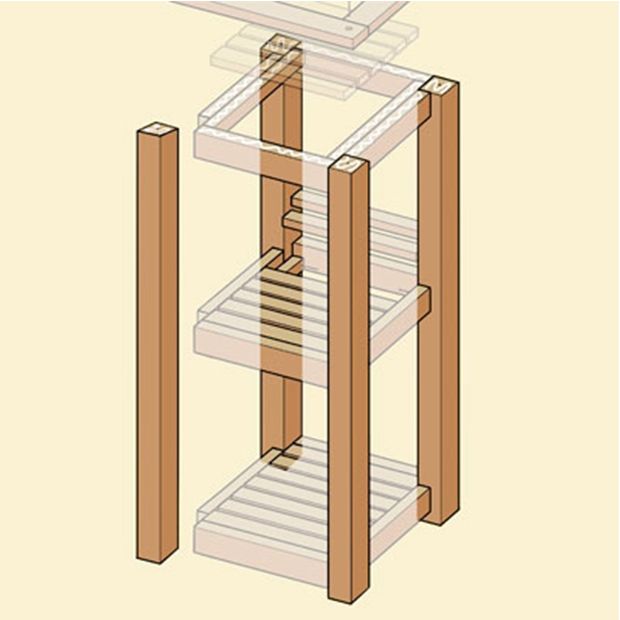
Place two legs in your work flooring and apply glue to the notches on one shelf. Stand the shelf between the legs at its marked place and clamp all of the items tightly. Working from the underside, drill pilot holes via the cleats and into each leg, then drive trim-head screws into these holes. Repeat this course of for the middle shelf, guaranteeing all of the items is sq. and diploma.
Ending the Excessive Shelf of the Bathtub Stand
The best shelf is the last word most important a part of your tub stand. This half will data you through attaching and ending this significant factor.
Attaching the Excessive Shelf Physique
Flip the best shelf physique the mistaken manner up and repair it flush with the tops of the legs. Use the equivalent methodology of gluing, clamping, and screwing as you most likely did with the lower cupboards.
Placing within the Face Physique
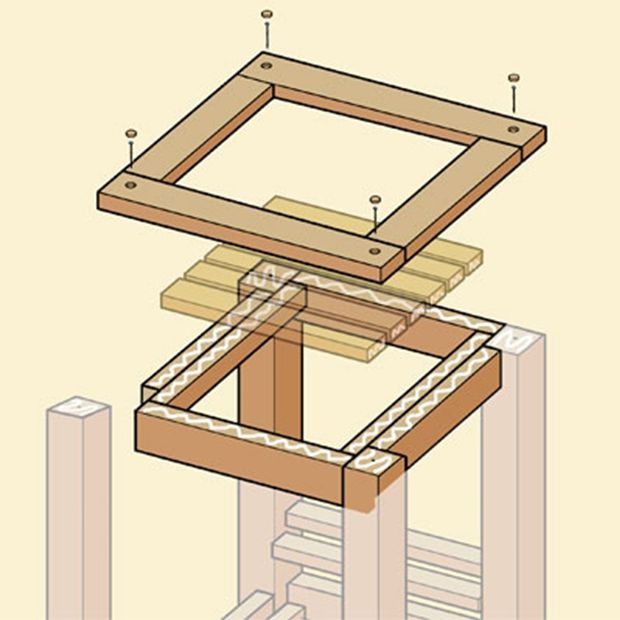
Glue collectively the objects to create the face physique, which may cowl the tops of the legs and embody the slats. As quickly as dry, line up the physique’s corners with the leg corners. Use a mixture countersink bit to drill pilot holes and create recesses for plugs. Glue the physique to the legs and aprons, then protected with deck screws.
Together with Slats to the Excessive Shelf
Now it’s time in order so as to add the slats to your excessive shelf. Glue the slats to the cleats, spacing them evenly nonetheless leaving no gap between them and the physique. This creates a secure flooring for the best tier of your stand.
Three-Tiered Bathtub Stand Ending Touches
These closing steps will elevate your tub stand from a elementary building to a elegant piece of furnishings.
Sanding and Smoothing
Sand all surfaces of your tub stand, starting with coarser grit sandpaper and progressing to finer grits for a clear finish. Pay specific consideration to edges and joints for an knowledgeable look.
Making use of Water-Resistant Finish
Given the humid setting a WC, it’s important to protect your stand with a water-resistant finish. Apply an oil-based polyurethane or a marine-grade varnish, following the producer’s instructions for among the finest outcomes.
Bathtub Stand Repairs and Care
Right care will assure your tub stand stays sensible and interesting for years to come back again. Proper right here’s the best way to keep up it in tip-top type:
Clear Your Bathtub Stand
Recurrently mud your stand with a mushy, dry cloth. For deeper cleaning, use a barely damp cloth with delicate cleansing cleaning soap, being cautious to not oversaturate the picket. Dry immediately with a transparent towel.
Protect In direction of Moisture
To deal with the integrity of your stand, steer clear of inserting moist objects instantly on the picket surfaces. Use decorative trays or containers to catch drips and defend the top from water hurt.
Additional Ideas and Enhancements for a Bathtub Stand
There are fairly just a few strategies to further elevate your three-tiered tub stand. Bear in mind the subsequent enhancements for added efficiency and magnificence.
Incorporate Decorative Elements
Add decorative elements much like ornate moldings or decorative brackets to personalize your stand. These additions can enhance the stand’s aesthetics and make it a centerpiece in your toilet.
Add Storage Tools
Mix small storage tools much like hooks for hanging towels or baskets for holding toiletries. These sensible additions can maximize the utility of your stand and keep your toilet organized.